Handling images on the Gamebuino META
Saturday, May 1, 2021 ( Last modified: Friday, May 14, 2021 )
How to decorate the game scene
It’s time to set the scene using our tileset:
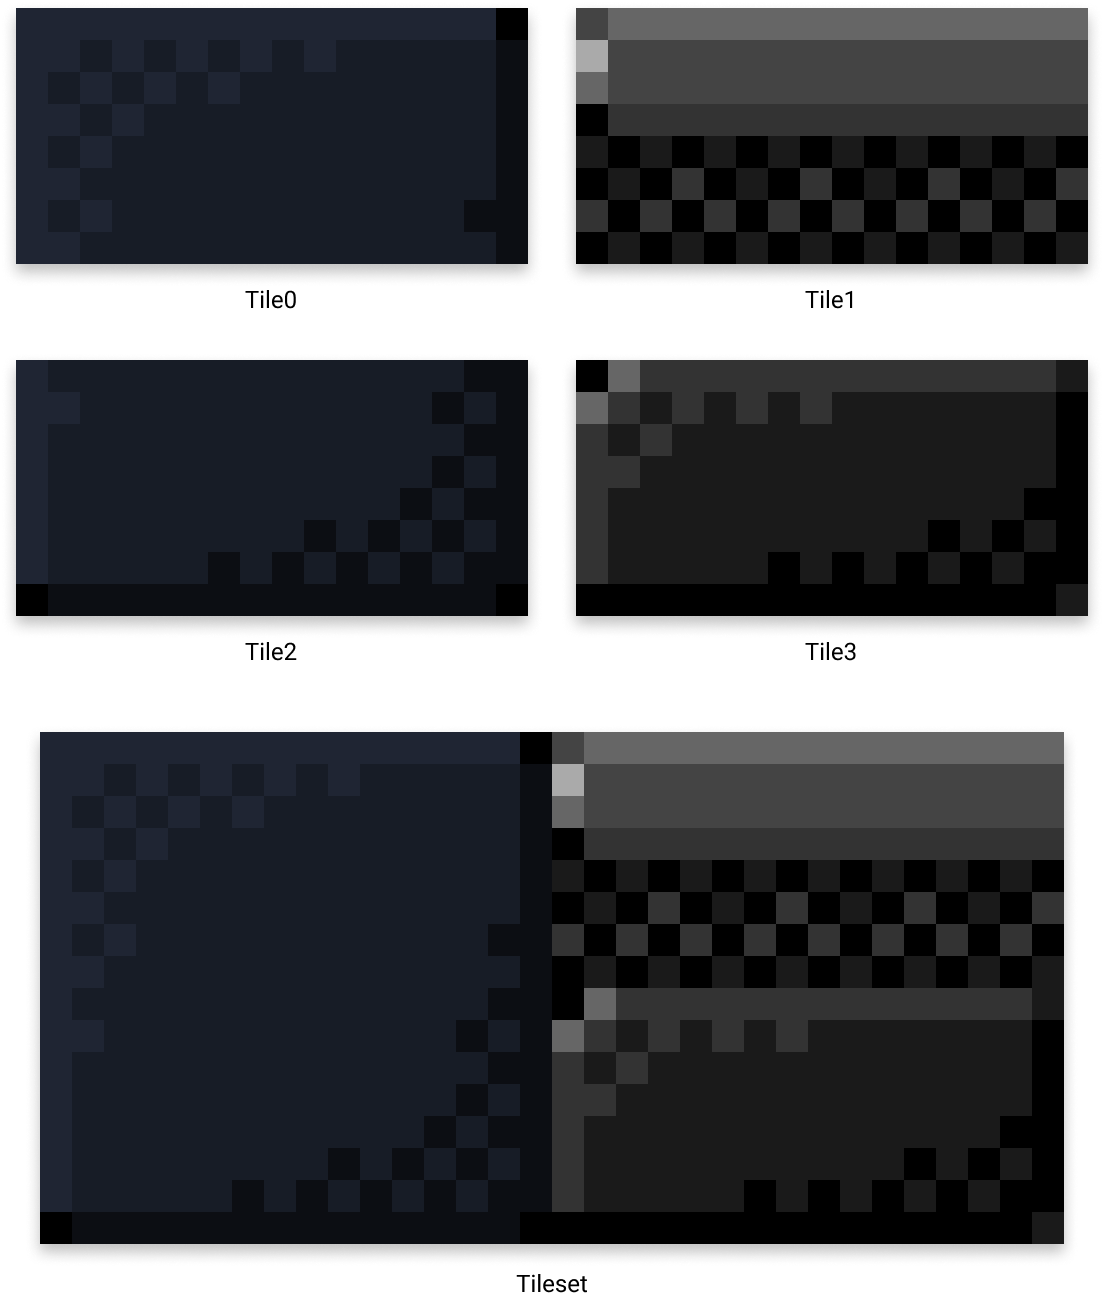
Each tile is defined by a frame in the TILESET_DATA array. We have 4 tiles, so 4 frames, which can be represented by an index between 0 and 3. Unlike the sprite, the tileset frames are not intended to be animated. On the contrary, we will need to designate precisely which frame to display at which place on the screen.
That’s why we set the frame_loop property to 0:
assets/rgb565.h
const uint16_t TILESET_DATA[] = {

    // metadata

    16,     // frame width
    8,      // frame height
    4,      // frames
    0,      // frame loop
    0xf81f, // transparent color
    0,      // 16-bits color mode

    // colormap
This allows to disable the automatic animation process handled by gb.display.
To display a particular frame, we will use the setFrame() method of the Image class:
void setFrame(uint16_t frame);
For example, to cover the whole screen with tiles of index 0 and 2, we can do the following:
examples/example-10.h
#include <Gamebuino-Meta.h>
#include "../assets/rgb565.h"

const uint8_t SCREEN_WIDTH  = 80;
const uint8_t SCREEN_HEIGHT = 64;

const uint8_t TILE_WIDTH  = TILESET_DATA[0];
const uint8_t TILE_HEIGHT = TILESET_DATA[1];

const uint8_t TILES_WIDE = SCREEN_WIDTH  / TILE_WIDTH;
const uint8_t TILES_HIGH = SCREEN_HEIGHT / TILE_HEIGHT;

Image tileset(TILESET_DATA);

void setup() {
    gb.begin();
    gb.setFrameRate(32);
}

void loop() {

    gb.waitForUpdate();
    gb.display.clear();

    for (uint8_t j=0; j<TILES_HIGH; ++j) {
        for (uint8_t i=0; i<TILES_WIDE; ++i) {

            tileset.setFrame(2*(j & 0x1));

            gb.display.drawImage(
                i*TILE_WIDTH,  // x
                j*TILE_HEIGHT, // y
                tileset        // image
            );

        }
    }

}
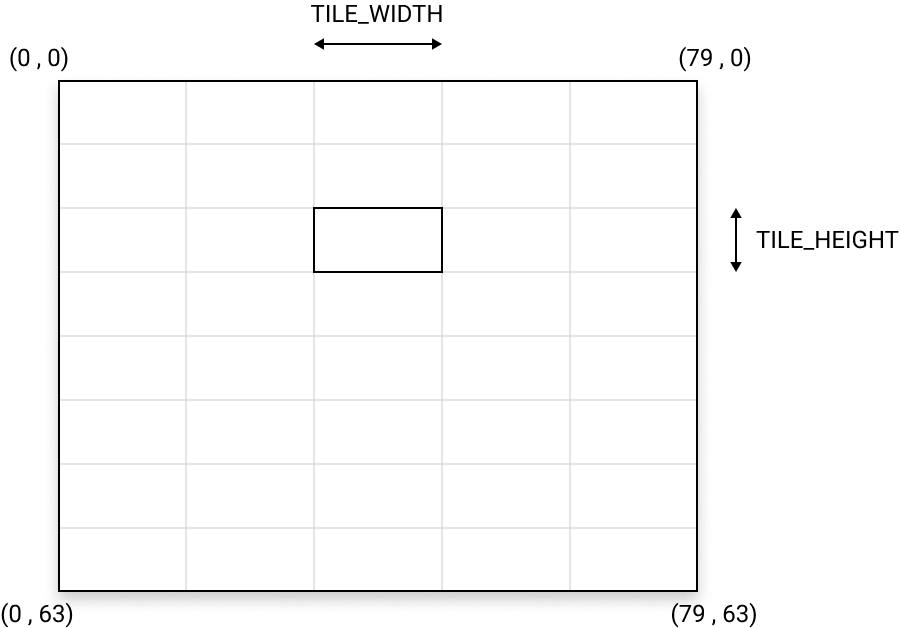
We determine the number of tiles to display according to their horizontal and vertical dimensions:
- on the screen width:
TILES_WIDE - on the screen height:
TILES_HIGH
const uint8_t TILE_WIDTH  = TILESET_DATA[0];
const uint8_t TILE_HEIGHT = TILESET_DATA[1];

const uint8_t TILES_WIDE = SCREEN_WIDTH  / TILE_WIDTH;
const uint8_t TILES_HIGH = SCREEN_HEIGHT / TILE_HEIGHT;
This is equivalent to cutting the screen in the form of a grid whose cells are the tiles :
Then we instantiate in memory an image containing our tileset:
Image tileset(TILESET_DATA);
Then, you just have to go through each cell of the grid:
// the tile grid is crossed in height:
for (uint8_t j=0; j<TILES_HIGH; ++j) {

    // and in width:
    for (uint8_t i=0; i<TILES_WIDE; ++i) {

        // ...

    }
}
And for each (i,j) coordinates on the tileset, we determine the (x,y) coordinates of the image to be displayed on the screen. But just before displaying it, we select the right frame in the tileset:
tileset.setFrame(2*(j & 0x1));

gb.display.drawImage(
    i*TILE_WIDTH,  // x
    j*TILE_HEIGHT, // y
    tileset        // image
);
If the line number j is even, we select the frame with index 0, and if j is odd, we select the frame with index 2:
Tilemap dynamically computed
Here the mapping of the screen is obtained by a calculation procedure at runtime. This procedure can be useful in some cases, but it is more common to establish this mapping in a data array, explicitly indicating which frame to display on which cell of the grid:
const uint8_t TILEMAP[] = {
    0, 0, 0, 0, 0,
    2, 2, 2, 2, 2,
    0, 0, 0, 0, 0,
    2, 2, 2, 2, 2,
    0, 0, 0, 0, 0,
    2, 2, 2, 2, 2,
    1, 1, 1, 1, 1,
    3, 3, 3, 3, 3
};
The TILEMAP array simply establishes the layout of the tiles on the screen.
Let’s integrate this new process into the code:
examples/example-11.h
#include <Gamebuino-Meta.h>
#include "../assets/rgb565.h"

const uint8_t SCREEN_WIDTH  = 80;
const uint8_t SCREEN_HEIGHT = 64;

const uint8_t TILE_WIDTH  = TILESET_DATA[0];
const uint8_t TILE_HEIGHT = TILESET_DATA[1];

const uint8_t TILES_WIDE = SCREEN_WIDTH  / TILE_WIDTH;
const uint8_t TILES_HIGH = SCREEN_HEIGHT / TILE_HEIGHT;

const uint8_t TILEMAP[] = {
    0, 0, 0, 0, 0,
    2, 2, 2, 2, 2,
    0, 0, 0, 0, 0,
    2, 2, 2, 2, 2,
    0, 0, 0, 0, 0,
    2, 2, 2, 2, 2,
    1, 1, 1, 1, 1,
    3, 3, 3, 3, 3
};

Image tileset(TILESET_DATA);

void setup() {
    gb.begin();
    gb.setFrameRate(32);
}

void loop() {

    gb.waitForUpdate();
    gb.display.clear();

    for (uint8_t j=0; j<TILES_HIGH; ++j) {
        for (uint8_t i=0; i<TILES_WIDE; ++i) {

            tileset.setFrame(TILEMAP[i + j * TILES_WIDE]);

            gb.display.drawImage(
                i*TILE_WIDTH,  // x
                j*TILE_HEIGHT, // y
                tileset        // image
            );

        }
    }

}
And we obtain the game scene defined by the TILEMAP array:
Static tilemap
Now, we just have to integrate our avatar and examine how to control its movements and the resulting sprite animations. This is precisely what we will do in the next chapter.