Handling images on the Gamebuino META
Saturday, May 1, 2021 ( Last modified: Sunday, May 9, 2021 )
Display modes on the META
Before diving into programming and discovering how to display and animate images with the META, we need to examine the console’s display device and understand what is available to us through the Gamebuino-META library to exploit its capabilities.
The hardware
The META incorporates a popular 1.8” TFT screen, the ST7735R, found on many electronic devices, including other programmable handheld game consoles such as the PyGamer from Adafruit.


1.8” TFT color display ST7735R with 160x128 resolution
This small screen has an internal memory that can store up to 162x132 pixels with 18 bits of depth to code the color of each pixel. Several display modes are available, with three different color spaces: RGB444, RGB565 and RGB666. The META has been configured to use a resolution of 160x128 pixels in the RGB565 color space (5 bits for red, 6 bits for green and 5 bits for blue), i.e. with a depth of 5+6+5 = 16 bits. Therefore, each pixel of the screen can show a color among 216 = 65,536… Which is not bad, and leaves us free to express our creativity. Here is a small overview of the diversity of colors that can be obtained on the META:
A burst of color on the Gamebuino META screen
The nuances between these different specifications may not yet evoke much in your mind, but don’t worry, we’ll clear it all up later…
The display modes available on the META
The direct operation of a TFT screen like the ST7735R is relatively complex and requires a lot of knowledge to browse and understand its technical documentation. To make things easier for us, experienced developers have coded specialized software libraries, which provide interfaces to these complex devices, and thus simplify things considerably.
The Gamebuino-META library provides a consistent API dedicated to the display and, in particular, to the display of images: gb.display. This API allows to control 3 specific display modes, among the 4 available on the META:
| Display modes | Resolution | Color space | |
|---|---|---|---|
| 1 | DISPLAY_MODE_RGB565 | 80x64 | 216 colors |
| 2 | DISPLAY_MODE_INDEX | 160x128 | 16 indexed colors |
| 3 | DISPLAY_MODE_INDEX_HALFRES | 80x64 | 16 indexed colors |
| 4 | Insider mode | 160x128 | 216 colors |
The 4th mode is a bit more complex to handle, and is for the more experienced among us, as it cannot be operated with the gb.display API. To use this mode, you will have to turn to another API, which is also provided by the Gamebuino-META library: gb.tft. This is actually an adaptation of the Adafruit-ST7735-library. The exploitation of the gb.tft API is beyond the scope of this tutorial and will not be discussed here.
Fine, but then why distinguish between all these display modes? What makes them different and how can you know which one to choose?
Impacts on memory management
Let’s take the example of display mode number 4 which allows us to fully exploit the capabilities of the ST7735R on the META. In this mode, the display consists in a matrix of 160x128 pixels in the RGB565 color space. That is to say that 5+6+5 = 16 bits are necessary to store the binary code of the color of each pixel.
The spatial and colorimetric reference of the screen is as follows:
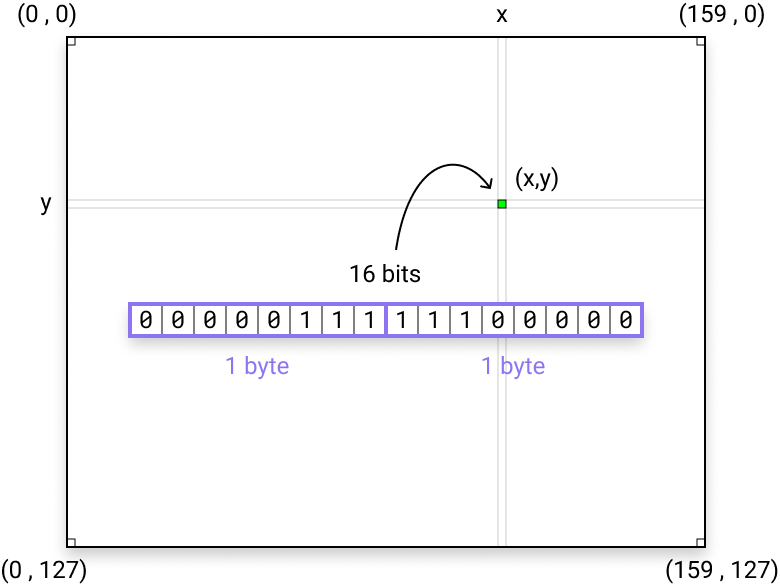
Discretization of the display on the META
Each pixel is characterized by:
- a horizontal coordinate x which takes its values in the interval [0, 159],
- a vertical coordinate y which takes its values in the interval [0, 127],
- a color encoded on 16 bits, i.e. 2 bytes.
The origin of the spatial reference frame is in the upper left corner, at coordinates (0, 0).
Displaying a pixel on the screen, at the coordinates (x, y), means assigning a color to this unit of surface. In other words, we will need a memory space of 2 bytes to write and store the 16 bits of color code associated with this pixel. Insofar as the color of each pixel will be stored in memory, we can deduce the size of this space as follows:
160 x 128 x 16 bits = 160 x 128 x 2 bytes = 40,960 bytes = 40KB
This memory space corresponds to an area of preparation of the display which is called a graphic buffer. This area is used to collect the information that will then be transmitted to the display controller to finally be visible on the screen and result in a particular coloring of each light unit that makes up the screen. The TFT screen is part of the family of LCD screens in which each pixel is controlled by a tiny semiconductor that controls the amount of light to pass. The light is emitted using 3 light-emitting diodes: one for red, one for green and one for blue. It is the mixture of these 3 primary colors, with differentiated levels of light intensity that makes it possible to obtain the desired color, by additive composition.
The graphic buffer used to prepare the display is necessarily stored in RAM during the execution of the program, and is likely to change its state at any time. Indeed, instructions will continuously modify the graphics buffer to display what you want on the screen, when you want it.
The Gamebuino-META library takes care of this graphic buffer itself and exposes simplified routines that allow you to easily draw a line, a rectangle or a circle, or even reproduce an image that you have drawn in your favorite sprite editor. This is precisely the role of the specialized API gb.display. It takes care of translating the graphics directives you invoke into the appropriate update of the graphics buffer state. You don’t have to worry about this, although you can always write directly to the buffer if you know how.
Well, let’s get back to our little calculation… If we want to use the entire RGB565 color space with a resolution of 160x128 pixels, we need a 40k graphics buffer… Now, you probably know that the META only has 32k of RAM. So we have a big problem: how to fit 40k into 32k?
The graphic buffer of gb.display simply does not allow it. This is precisely why this display mode cannot be handled by the gb.display API. It’s not impossible in the absolute… but you have to use tricks… and use the gb.tft API, which is much more rudimentary, and therefore more complicated to use. That’s why this display mode is reserved for the initiated.
Well, what about the other modes?
DISPLAY_MODE_RGB565
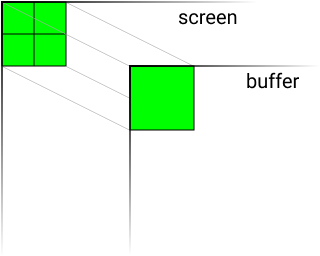
This is the default display mode (which will be applied automatically if you do not specify one). In this mode, to get around the problem of insufficient memory space, the surface of the screen’s spatial reference frame is divided by 4 by dividing its horizontal and vertical dimensions by 2. The graphic buffer is thus reduced to a memory space allowing to manage a display in a resolution of 80x64 pixels in the RGB565 color space, thus with a depth of 16 bits per pixel:
80 x 64 x 16 bits = 80 x 64 x 2 bytes = 10,240 bytes = 10KB
Pixel area divided by 4 ⇒ graphic buffer size divided by 4… logical.
The gb.display API will automatically cover the 160x128 pixels of the screen with the 80x64 pixels of the graphic buffer by simple projection. In other words, each pixel of the buffer will be reproduced on 4 pixels of the screen, as shown in the following figure:
DISPLAY_MODE_INDEX
Here, the trick is different: we don’t touch the spatial dimensions (we stay in 160x128), but we negotiate on the color space by drastically reducing the number of available colors. Indeed, we will limit ourselves to a palette of 16 colors (each one can be chosen in the RGB565 space). Each color is associated with an index between 0 and 15 in a reference table. And it is precisely this index that will be transferred to the graphic buffer at the coordinates of the pixel that has the corresponding color (1 single byte is enough here to encode an integer between 0 and 15). But the trick goes further: to encode an integer between 0 and 15, in reality, we just need 4 bits (24 = 16 possibilities, so 16 colors), right? Now, on a byte (8 bits), we can store 2 packets of 4 bits. In other words, with a single byte, we can encode the respective colors of 2 neighboring pixels! As a result, it still allows to divide by 2 the number of bytes necessary to encode the colors of 160x128 pixels, since they are encoded by pairs of 4 bits. Therefore:
160 x 128 x 4 bits = 160 x 128 x ½ bytes = 10,240 bytes = 10KB
And we land on our feet, as in the previous case.
DISPLAY_MODE_INDEX_HALFRES
Here, the reasoning is the same with a display surface divided by 4 (we go back to 80x64) while retaining a 16 color only palette:
80 x 64 x 4 bits = 80 x 64 x ½ bytes = 2,560 bytes = 2.5KB
Not surprisingly: area divided by 4 ⇒ buffer size divided by 4.
The copy on the screen is done by projection, as in the case of DISPLAY_MODE_RGB565.
Summary
To summarize, here are the technical constraints that you must keep in mind before choosing the most appropriate display mode for your game. Indeed, you must choose it once and for all, from the beginning. It will be difficult to go back…
| Display mode | Résolution | Color space | Buffer size |
|---|---|---|---|
DISPLAY_MODE_RGB565 | 80x64 | 216 colors | 10k |
DISPLAY_MODE_INDEX | 160x128 | 16 indexed colors | 10k |
DISPLAY_MODE_INDEX_HALFRES | 80x64 | 16 indexed colors | 2.5k |
| Insider mode | 160x128 | 216 colors | 40k |
Warning
With indexed display modes, you only have 16 colors in all! This means that all the graphical elements in your game will have to share the single color palette you have defined. So, don’t forget to take this into account when you draw your sprites and scenery elements in your game…
And yes… you save memory space, but at the same time you lose the color potential of the RGB565 space…
Project initialization
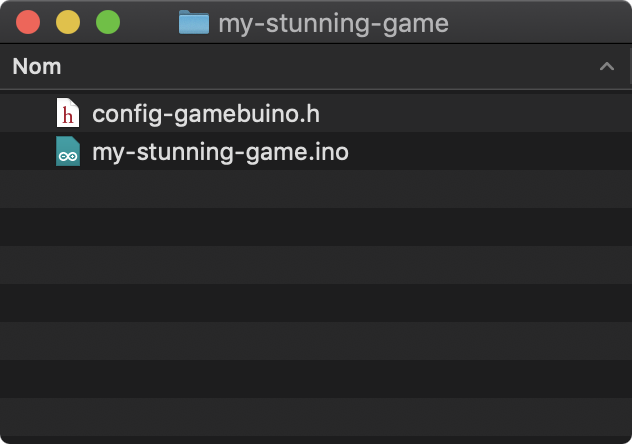
To start our project, I suggest you create a new sketch with the Arduino IDE, and name it my-stunning-game. This will generate the following folder:

The Arduino IDE requires to name the project folder with the same name as the main sketch.
How to configure the display mode of your project
The display mode must be defined at the beginning, when you start your project. To do this, you must create a configuration file, at the root of your project, named config-gamebuino.h:
Then you have to define the DISPLAY_MODE macro, with the display mode you want to apply to your project. The Gamebuino-META library provides the following three macros for this:
DISPLAY_MODE_RGB565DISPLAY_MODE_INDEXDISPLAY_MODE_INDEX_HALFRES
To apply the 80x64 display mode with 216 colors (full RGB565), simply state:
config-gamebuino.h
#define DISPLAY_MODE DISPLAY_MODE_RGB565
This is the default mode. So if your project does not have a config-gamebuino.h file, or if the DISPLAY_MODE macro is not specified, then the display mode will automatically be set to DISPLAY_MODE_RGB565.
To apply the 160x128 display mode with 16 indexed colors, you must declare:
config-gamebuino.h
#define DISPLAY_MODE DISPLAY_MODE_INDEX
Last possibility, to apply the 80x64 display mode with 16 indexed colors, declare:
config-gamebuino.h
#define DISPLAY_MODE DISPLAY_MODE_INDEX_HALFRES
Demonstration
Here is a small demo code to check the available memory space in RAM:
my-stunning-game.ino
#include <Gamebuino-Meta.h>

const char *FORMAT = "FREE RAM: %u";

void setup() {
    gb.begin();
}

void loop() {
    gb.waitForUpdate();
    gb.display.clear();
    gb.display.setFontSize(1);
    gb.display.printf(2, 2, FORMAT, gb.getFreeRam());
}
Test it with each of the display modes, and you should get the following results:
DISPLAY_MODE_RGB565
DISPLAY_MODE_INDEX
DISPLAY_MODE_INDEX_HALFRES
The observed values are identical for DISPLAY_MODE_RGB565 and DISPLAY_MODE_INDEX, which is logical since the size of the graphic buffer is identical in both cases. On the other hand, if you calculate the difference between the observed value for DISPLAY_MODE_INDEX_HALFRES and that for the two previous cases, you will notice that:
22,839 - 15,159 = 7,680 bytes = 7.5k
This difference corresponds exactly to the difference in size of their respective buffers:
10k - 2.5k = 7.5k
Now that things are clearer about the META hardware and the possibilities offered by the gb.display API, we will see in the next chapter how to prepare the images we want to display on the screen.