Handling images on the Gamebuino META
Saturday, May 1, 2021
How to convert your images into C++
Before we find out how to transcode the graphical elements we have created so that we can manipulate them programmatically and display them on the screen, we need to examine how images are represented in C++ on the META.
Image class
We saw, in the first part of this tutorial, that gb.display is a specialized API allowing, among other things, to display images, by adapting to 3 particular display modes, with very specific resolutions and color depths.
We also saw that this API handles a graphic buffer, which we do not have to worry about directly, and whose size is automatically adapted to the display mode configured for the project.
We will see that in fact gb.display corresponds intrinsically to the conceptual representation of an image and is built according to a precise object-oriented model, which is described by the Image class provided by the Gamebuino-META library. This model exposes constructors that allow to easily instantiate (create) images from specific parameters.
Among the constructors that are provided, those of primary interest to us are the following:
// flash constructors
Image(const uint16_t* buffer);

// flash indexed constructors
Image(const uint8_t* buffer);
Remember, with DISPLAY_MODE_RGB565, colors are stored on 2 bytes, so 16 bits. In C++, to store data of this form, we use the uint16_t type. With DISPLAY_MODE_INDEX and DISPLAY_MODE_INDEX_HALFRES, each of the 16 colors is stored on 1 byte, thus 8 bits. In C++, we will use the uint8_t type for that.
This is the reason why the two constructors above can be invoked with data arrays of two particular types: uint16_t and uint8_t. We will use the first one for the default display mode, and the second one for the indexed color display modes.
Now let’s see how these data tables are built.
Data arrays for image processing
To create an image that is an instance of the Image class, we will have to pass to the constructor of the Image class an array of data containing all the parameters required to build a precise representation of the image in order to display it correctly on the screen. This data array is made up of 2 distinct blocks:
| Metadata header | A header describing the metadata of the image |
| Colormap | The list of color codes characterizing the pixels of the image |
These data must all be expressed with the appropriate type according to the chosen display mode:
uint16_tin the case ofDISPLAY_MODE_RGB565uint8_tin the case ofDISPLAY_MODE_INDEXorDISPLAY_MODE_INDEX_HALFRES
So this is how the skeleton of this data array looks like:
DISPLAY_MODE_RGB565
const uint16_t IMAGE_DATA[] = {

    // Metadata header
    // ...

    // Colormap
    // ...
};
DISPLAY_MODE_INDEX ou DISPLAY_MODE_INDEX_HALFRES
const uint8_t IMAGE_DATA[] = {

    // Metadata header
    // ...

    // Colormap
    // ...
};
Important note
The
IMAGE_DATAarray is defined as a constant by the C++constkeyword. This is because the data it contains is not intended to be changed during program execution. The advantage of constant data is that the compiler will make sure that it is stored in the Flash memory of the microcontroller. They will not occupy any space in RAM as such.
Image metadata header
With RGB565 display mode
In the case of the DISPLAY_MODE_RGB565, the block of metadata characterizing the image is in the following form:
| frame_width | Width of each frame in number of pixels |
| frame_height | Height of each frame in number of pixels |
| frames | Number of frames making up the image |
| frame_loop | Number of display loops characterizing the persistence of the current frame |
| transparent_color | Image transparency color |
| color_mode | 0 |
I guess there is no need to explain further, except to clarify things a bit about the frame_loop property. This property only makes sense for animated images like sprites. For static images like tiles which are the background of the game scene, this property has no meaning and should be set to 0.
To understand what frame_loop means and what the value assigned to it implies, let’s start with a typical META program:
#include <Gamebuino-Meta.h>

void setup() {
    gb.begin();
}

void loop() {
    gb.waitForUpdate();
}
The gb.waitForUpdate() instruction allows, among other things, to ensure that the display frequency is maintained at 25 refreshes per second. It triggers various control routines that ensure the intrinsic operation of the console, such as the management of automated animations with frame_loop, the transfer of the graphics buffer from gb.display to the screen or the reading of the button status, and many other things.
The sequence of routines triggered to perform all these operations obviously takes some time to execute, even if it seems very fast. The total execution time of this sequence is measured precisely. To maintain a regular frequency of 25 refreshes per second, a complete cycle of the loop() must be executed in 1000 / 25 = 40 ms. If by any chance the execution of the cycle takes less time than expected, gb.waitForUpdate() will order the microcontroller to pause until the 40 ms have elapsed. This is how the display frequency is regulated.
If, on the other hand, the execution time of a complete cycle is greater than 40 ms, this means that the refresh rate is set too high for the microcontroller to have time to satisfy it. It will be overwhelmed by the amount of tasks to be accomplished in the allotted time and you will observe a more or less significant lag effect on the console screen.
To adjust the execution frequency of the loop() function, the Gamebuino class (of which gb is an instance) exposes a function that allows you to set it to the value of your choice as long as it does not exceed 50 frames per second (fps):
void Gamebuino::setFrameRate(uint8_t fps)
It is expressed in fps in reference to the number of frames, constituted by the successive states of the graphic buffer, which can be sent to the display device (the screen) by the microcontroller, each second, insofar as it is able to maintain this frequency without being overloaded.
Suppose, for example, that we set this frequency to 32 fps:
#include <Gamebuino-Meta.h>

void setup() {
    gb.begin();
    gb.setFrameRate(32);
}

void loop() {
    gb.waitForUpdate();
}
In this case the loop() function will be executed 32 times per second. In other words a complete cycle will last 1000 / 32 = 31.25 ms.
Let’s go back to the frame_loop metadata of the image. It simply allows to set the number of cycles during which each frame of the animation will remain displayed on the screen before moving to the next frame. This is automatically taken care of by gb.waitForUpdate()… In other words, if frame_loop = 4, each frame of the animation will remain displayed on the screen for 4 cycles before the next frame is displayed in turn for 4 new cycles, etc.
Therefore, if the global refresh rate of the screen is set to 32 fps, then the animation will progress at the rate of 32 / 4 = 8 fps. frame_loop therefore allows to set the speed of the animation playback head, in relation to the global display rate. And each animated image can obviously be set with a different speed, since the frame_loop metadata is defined for a given image.
In cases where frame_loop is set to 0, the image is then frozen on its first frame. We will see later how to explicitly specify the index of the frame we want to display. Moreover, if the image only contains tiles that are supposed to compose the scenery of the game scene, it is useless to set a value other than 0 to frame_loop, since no animation is supposed to be played. Each tile is independent, even if it is part of the same tileset. Again, we will see later how to designate a particular tile among all the tiles that make up the tileset.
To fix your ideas, here is how to declare the metadata of our sprite:
const uint16_t SPRITE_DATA[] = {

    // Metadata header

    8,      // frame_width
    8,      // frame_height
    4,      // frames
    4,      // frame_loop
    0xf81f, // transparent_color
    0,      // color_mode

    // Colormap
    // ...
};
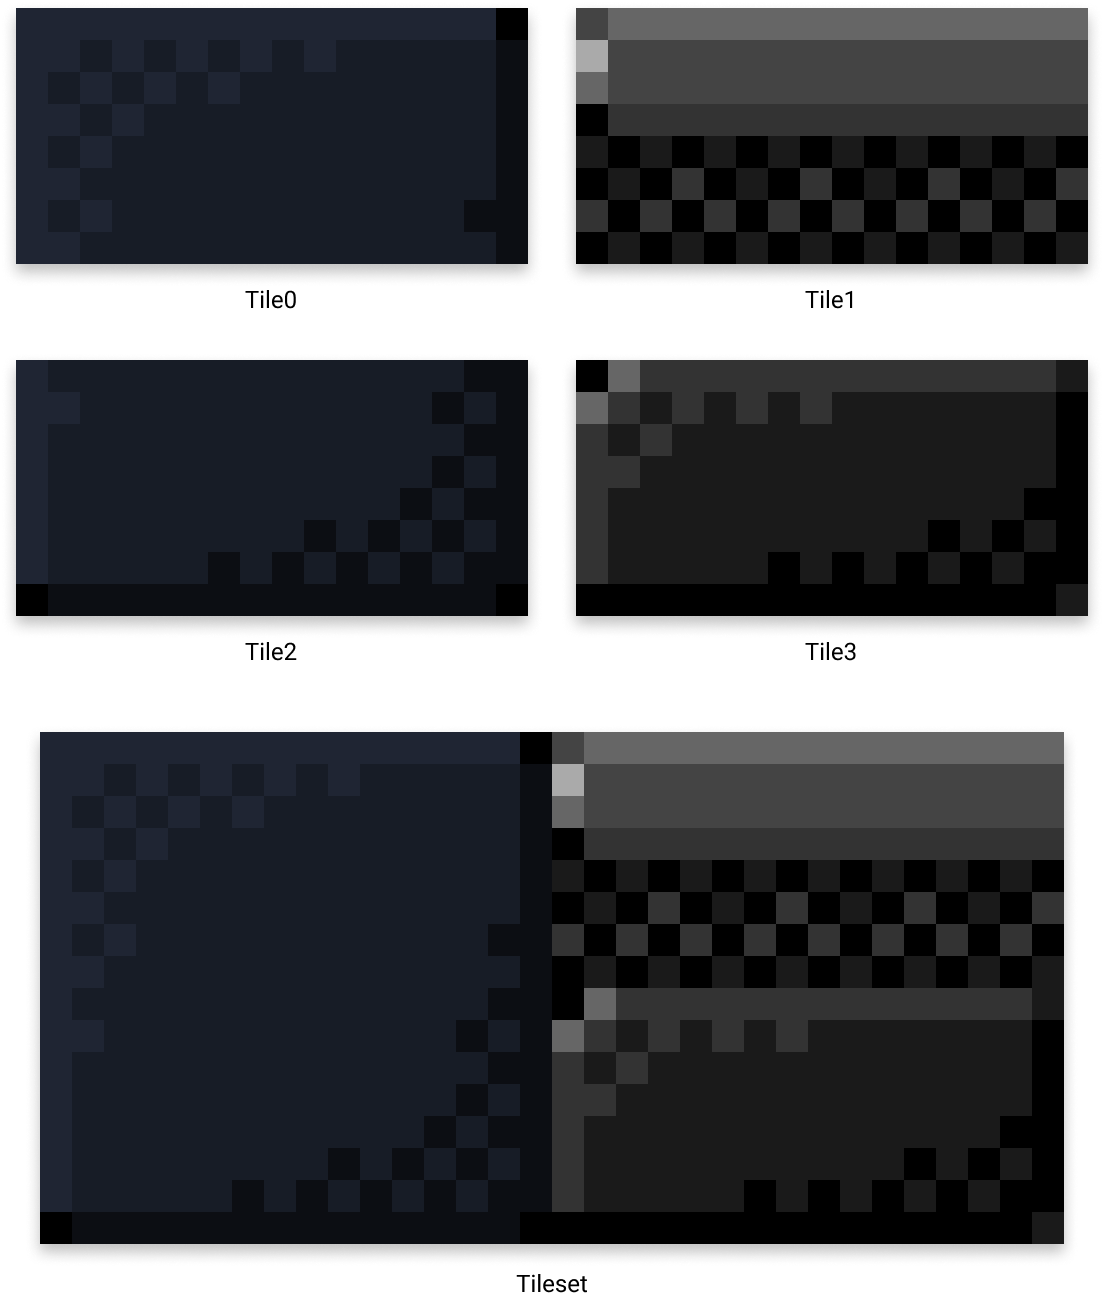
And here is how to declare the metadata of our tileset:
const uint16_t TILESET_DATA[] = {

    // Metadata header

    16,     // frame_width
    8,      // frame_height
    4,      // frames
    0,      // frame_loop
    0xf81f, // transparent_color
    0,      // color_mode

    // Colormap
    // ...
};
You can see by the way that with the C++ language the hexadecimal notation can be written in lower or upper case. The compiler will interpret them in the same way.
With the indexed color display modes
In the case of the DISPLAY_MODE_INDEX and DISPLAY_MODE_INDEX_HALFRES, the metadata are globally the same, with the only difference that the number of frames constituting the image is here decomposed on a pair of uint8_t:
| frame_width | Width of each frame in number of pixels |
| frame_height | Height of each frame in number of pixels |
| frames_lower_byte | Number of frames making up the image (low order bits byte) |
| frames_higher_byte | Number of frames constituting the image (high order bits byte) |
| frame_loop | Number of display loops characterizing the persistence of the current frame |
| transparent_color | Image transparency color |
| color_mode | 1 |
The frames metadata that we saw before is here split into two values: frames_lower_byte and frames_higher_byte. And this is imposed on us by the very nature of the image data array which can only be made up of uint8_t values. Indeed, uint8_t allows to encode the value of an unsigned integer on 8 bits. Therefore, only values between 0 and 255 can be represented by an uint8_t (28 = 256 possible values… but not one more). So this data type seems to be constraining by requiring us to limit ourselves to images with no more than 255 frames in total.
This is where the trick lies: by doubling the number of bytes to store the number of frames, this time you are allowed to code up to 216 - 1 = 65,535 frames on a single image! Well, it seems enormous seen like that, but it is necessary to cross the 255 frames barrier.
Let’s suppose, for example, that we want to encode a tileset with 718 tiles. This is quite feasible for a complete game. By expressing this number on 2 bytes, in its binary and hexadecimal forms, we obtain the following distribution:
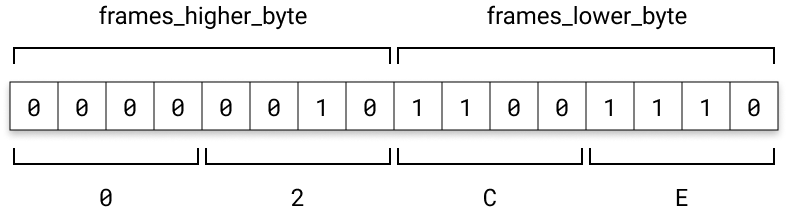
And at the same time, we can deduce that:
frames_lower_byte = 0xCEframes_higher_byte = 0x02
For numbers less than 256, frames_higher_byte will always be equal to 0x00.
Here is how to declare the metadata of our sprite:
const uint8_t SPRITE_DATA[] = {

    // Metadata header

    8,    // frame_width
    8,    // frame_height
    0x04, // frames_lower_byte
    0x00, // frames_higher_byte
    4,    // frame_loop
    0xe,  // transparent_color
    1,    // color_mode

    // Colormap
    // ...
};
And here is how to declare the metadata of our tileset:
const uint8_t TILESET_DATA[] = {

    // Metadata header

    16,   // frame_width
    8,    // frame_height
    0x04, // frames_lower_byte
    0x00, // frames_higher_byte
    0,    // frame_loop
    0xe,  // transparent_color
    1,    // color_mode

    // Colormap
    // ...
};
Image Colormap
The second block of the data array, which comes after the image metadata, is what is known as the image colormap, i.e. the list of color codes for the pixels making up each of the image frames. These color codes are written one after the other, in the direction in which the pixels are read, from left to right, then from top to bottom, in the order in which the frames follow each other.
Let’s go back to the spritesheet of our avatar, taking into account the modification of the color palette which now includes the colors of the tileset that we added:
![]()
Sprite Colormap
We can now complete the SPRITE_DATA array by adding its colormap.
DISPLAY_MODE_RGB565
The conversion here is quite simple, just follow the pixels in order, replacing the index of the color by its RGB565 value:
const uint16_t SPRITE_DATA[] = {

    // Metadata header

    8,      // frame_width
    8,      // frame_height
    4,      // frames
    4,      // frame_loop
    0xf81f, // transparent_color
    0,      // color_mode

    // Colormap

    // Frame 0
    0xf81f, 0xf81f, 0x632c, 0xad55, 0xad55, 0xad55, 0xf81f, 0xf81f,
    0xf81f, 0xf81f, 0xee2f, 0xff36, 0xff36, 0xff36, 0xf81f, 0xf81f,
    0xf81f, 0xf81f, 0xee2f, 0x0000, 0xff36, 0x0000, 0xf81f, 0xf81f,
    0xf81f, 0xf81f, 0xee2f, 0xff36, 0xff36, 0xff36, 0xf81f, 0xf81f,
    0xf81f, 0xf81f, 0x7afa, 0xb4df, 0xb4df, 0xb4df, 0xf81f, 0xf81f,
    0xf81f, 0xf81f, 0xff36, 0xb4df, 0xb4df, 0xb4df, 0xff36, 0xf81f,
    0xf81f, 0xf81f, 0x7afa, 0xb4df, 0xb4df, 0xb4df, 0xf81f, 0xf81f,
    0xf81f, 0xf81f, 0x6217, 0xf81f, 0xf81f, 0x6217, 0xf81f, 0xf81f,

    // Frame 1
    0xf81f, 0xf81f, 0x632c, 0xad55, 0xad55, 0xad55, 0xf81f, 0xf81f,
    0xf81f, 0xf81f, 0xee2f, 0xff36, 0xff36, 0xff36, 0xf81f, 0xf81f,
    0xf81f, 0xf81f, 0xee2f, 0x0000, 0xff36, 0x0000, 0xf81f, 0xf81f,
    0xf81f, 0xf81f, 0xee2f, 0xff36, 0xff36, 0xff36, 0xf81f, 0xf81f,
    0xf81f, 0xf81f, 0x7afa, 0xb4df, 0xb4df, 0xb4df, 0xf81f, 0xf81f,
    0xf81f, 0xff36, 0x7afa, 0xb4df, 0xb4df, 0xb4df, 0x7afa, 0xff36,
    0xf81f, 0xf81f, 0x7afa, 0xb4df, 0xb4df, 0xb4df, 0xf81f, 0xf81f,
    0xf81f, 0xf81f, 0xf81f, 0x7afa, 0x6217, 0xf81f, 0xf81f, 0xf81f,

    // Frame 2
    0xf81f, 0xf81f, 0x632c, 0xad55, 0xad55, 0xad55, 0xf81f, 0xf81f,
    0xf81f, 0xf81f, 0xee2f, 0xff36, 0xff36, 0xff36, 0xf81f, 0xf81f,
    0xf81f, 0xf81f, 0xee2f, 0x0000, 0xff36, 0x0000, 0xf81f, 0xf81f,
    0xf81f, 0xf81f, 0xee2f, 0xff36, 0xff36, 0xff36, 0xf81f, 0xf81f,
    0xf81f, 0xf81f, 0x7afa, 0xb4df, 0xb4df, 0xb4df, 0xf81f, 0xf81f,
    0xf81f, 0xf81f, 0xff36, 0xb4df, 0xb4df, 0xb4df, 0xff36, 0xf81f,
    0xf81f, 0xf81f, 0x7afa, 0xb4df, 0xb4df, 0xb4df, 0xf81f, 0xf81f,
    0xf81f, 0xf81f, 0x6217, 0xf81f, 0xf81f, 0x6217, 0xf81f, 0xf81f,

    // Frame 3
    0xf81f, 0xf81f, 0x632c, 0xad55, 0xad55, 0xad55, 0xf81f, 0xf81f,
    0xf81f, 0xf81f, 0xee2f, 0xff36, 0xff36, 0xff36, 0xf81f, 0xf81f,
    0xf81f, 0xf81f, 0xee2f, 0x0000, 0xff36, 0x0000, 0xf81f, 0xf81f,
    0xf81f, 0xf81f, 0xee2f, 0xff36, 0xff36, 0xff36, 0xf81f, 0xf81f,
    0xf81f, 0xf81f, 0x7afa, 0xb4df, 0xb4df, 0xb4df, 0xf81f, 0xf81f,
    0xf81f, 0xf81f, 0x7afa, 0x7afa, 0xff36, 0xb4df, 0xf81f, 0xf81f,
    0xf81f, 0xf81f, 0x7afa, 0xb4df, 0xb4df, 0xb4df, 0xf81f, 0xf81f,
    0xf81f, 0x6217, 0xf81f, 0xf81f, 0xf81f, 0xf81f, 0x7afa, 0xf81f
};
DISPLAY_MODE_INDEX and DISPLAY_MODE_INDEX_HALFRES
Here, we do not directly transfer the RGB565 color codes, but their indices according to the order defined by the palette. It is therefore also necessary to code the palette itself. For this, the Gamebuino-META library provides a Color class that allows you to interpret a RGB565 hexadecimal code as a color (in the semantic sense).
In addition, do not forget that in the colormap, the color indices must be grouped by pairs of neighboring pixels on a single byte. The expression of the colormap is therefore much more concise:
const Color PALETTE[] = {
    (Color)0x0000, // color 0x0
    (Color)0x18c3, // color 0x1
    (Color)0x3186, // color 0x2
    (Color)0x4228, // color 0x3
    (Color)0x632c, // color 0x4
    (Color)0xad55, // color 0x5
    (Color)0xee2f, // color 0x6
    (Color)0xff36, // color 0x7
    (Color)0x0862, // color 0x8
    (Color)0x10e4, // color 0x9
    (Color)0x1926, // color 0xa
    (Color)0x6217, // color 0xb
    (Color)0x7afa, // color 0xc
    (Color)0xb4df, // color 0xd
    (Color)0xf81f, // color 0xe
    (Color)0x0000  // color 0xf
};

const uint8_t SPRITE_DATA[] = {

    // Metadata header

    8,    // frame_width
    8,    // frame_height
    0x04, // frames_lower_byte
    0x00, // frames_higher_byte
    4,    // frame_loop
    0xe,  // transparent_color
    1,    // color_mode

    // Colormap

    // Frame 0
    0xee, 0x45, 0x55, 0xee,
    0xee, 0x67, 0x77, 0xee,
    0xee, 0x60, 0x70, 0xee,
    0xee, 0x67, 0x77, 0xee,
    0xee, 0xcd, 0xdd, 0xee,
    0xee, 0x7d, 0xdd, 0x7e,
    0xee, 0xcd, 0xdd, 0xee,
    0xee, 0xbe, 0xeb, 0xee,

    // Frame 1
    0xee, 0x45, 0x55, 0xee,
    0xee, 0x67, 0x77, 0xee,
    0xee, 0x60, 0x70, 0xee,
    0xee, 0x67, 0x77, 0xee,
    0xee, 0xcd, 0xdd, 0xee,
    0xe7, 0xcd, 0xdd, 0xc7,
    0xee, 0xcd, 0xdd, 0xee,
    0xee, 0xec, 0xbe, 0xee,

    // Frame 2
    0xee, 0x45, 0x55, 0xee,
    0xee, 0x67, 0x77, 0xee,
    0xee, 0x60, 0x70, 0xee,
    0xee, 0x67, 0x77, 0xee,
    0xee, 0xcd, 0xdd, 0xee,
    0xee, 0x7d, 0xdd, 0x7e,
    0xee, 0xcd, 0xdd, 0xee,
    0xee, 0xbe, 0xeb, 0xee,

    // Frame 3
    0xee, 0x45, 0x55, 0xee,
    0xee, 0x67, 0x77, 0xee,
    0xee, 0x60, 0x70, 0xee,
    0xee, 0x67, 0x77, 0xee,
    0xee, 0xcd, 0xdd, 0xee,
    0xee, 0xcc, 0x7d, 0xee,
    0xee, 0xcd, 0xdd, 0xee,
    0xeb, 0xee, 0xee, 0xce
};
Perfect… now I’ll let you convert our beautiful tileset to make sure you understand the whole conversion process:
I’m just kidding… You can do it if you like, but you’ll agree that the whole conversion process is quite a lot of work, even if it’s intellectually fun, right? I let you imagine what it implies on a complete game with many graphical elements… It would be much more convenient if we could rely on an automatic conversion tool, right? Well, don’t worry… this tool exists.
I’ll show you in the next chapter…