Handling images on the Gamebuino META
Saturday, May 1, 2021 ( Last modified: Sunday, May 9, 2021 )
How to make your images for the META
An important step in the creation of a video game is the design of the graphic elements. Basically, the creation of a video game is the result of thinking about a concept that takes shape through the combination of pixels and computer code. Programming can be considered as an art that will bring the game to life.
Many graphic creation tools exist to create all the graphic elements that will compose the universe of your game, whether they are static or animated. I propose you some of them that caught my attention (but there are many others, more or less sophisticated):
I’ll let you discover them by yourself. This is not the purpose of this tutorial…
To focus my point, I will take the example of a platformer (a platform game), in which we will have to control a character, our avatar, to tell him how to move in his environment. We will therefore need a graphic element that is animated, to visually represent the actions performed by the avatar. In the field of video games, we call this a sprite.
Let’s consider the following sprite, which is relatively simple, and which allows us to animate our avatar in successive steps to give the illusion that he is walking or running (depending on the speed at which we link the steps):
![]()
![]()
Breaking down a frame-by-frame animation
The animation is made with a sequence of images (also called frames), which are displayed successively for a short time, in a specific order. It’s exactly the same principle we use in movies. This is also the same principle we use to create animated GIFs. But to animate our avatar in the game, we need to have total control over the order of the frames, as well as over the speed of the animation. This is where the code comes in.
We will see together how to give life to our avatar by displaying the sprite on the screen, in each of the display modes that are at our disposal. But before that, But before that, let’s analyze how the sprite is built.
Anatomy of a sprite
Let’s start by taking a closer look at our sprite to see what it is made of:
![]()
8x8 sprite colormap
It consists of a sequence of 4 frames each described on a grid of 8x8 pixels. Each pixel is characterized by a color in the #RRGGBB format. This is a very common format, found on the vast majority of graphic creation tools, allowing a color to be located in the RGB888 color space. This means that the intensity of each of the primary red, green and blue channels that make up the color is stored on 1 byte (8 bits). Since we have 3 channels, then it takes 3 bytes (3x8 = 24 bits) to store the color. Each byte can be broken down into a pair of 4 bits, so we get 3 pairs of 4 bits:
R1R2 G1G2 B1B2
In this format, each group of 4 bits is simply written in its hexadecimal form.
For example, let’s take the index 3 color #E8C47D in the palette of colors that make up our sprite. By the way, to make it clear that this is a value expressed in hexadecimal, we prefer to write it as 0xE8C47D, which is the one used in the C++ language. This color in RGB888 format can be broken down into 3 bytes (3x8 bits), as we have just seen, as well as 6 hexadecimal digits (6x4 bits), in the following way:
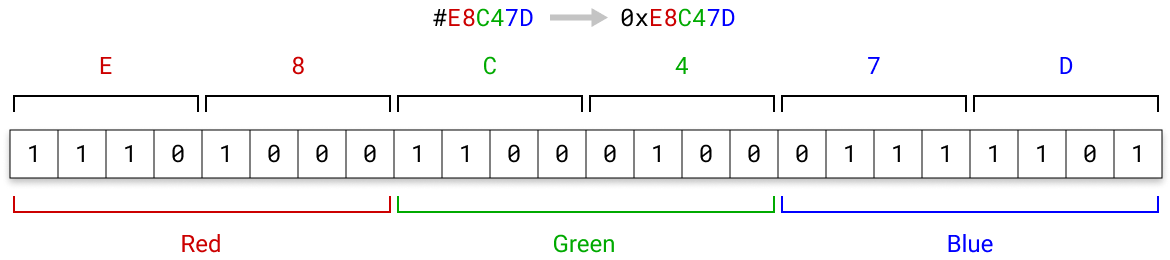
Anatomy of an RGB888 color
Converting RGB888 to RGB565
If graphic utilities allow us to work in the RGB888 space, the META screen can only display RGB565 colors. It is therefore necessary to convert the colors in this space.
For that, we will have to project the 3 bytes of RGB888 (24 bits) on the 2 bytes of RGB565 (16 bits). The method of projection is very simple here, it is enough to remove the bits of low weight on each of the bytes representing the primary channels: the last three bits of the red channel (8-3 = 5 bits), the last 2 bits of the green channel (8-2 = 6 bits) and the last 3 bits of the blue channel (8-3 = 5 bits):
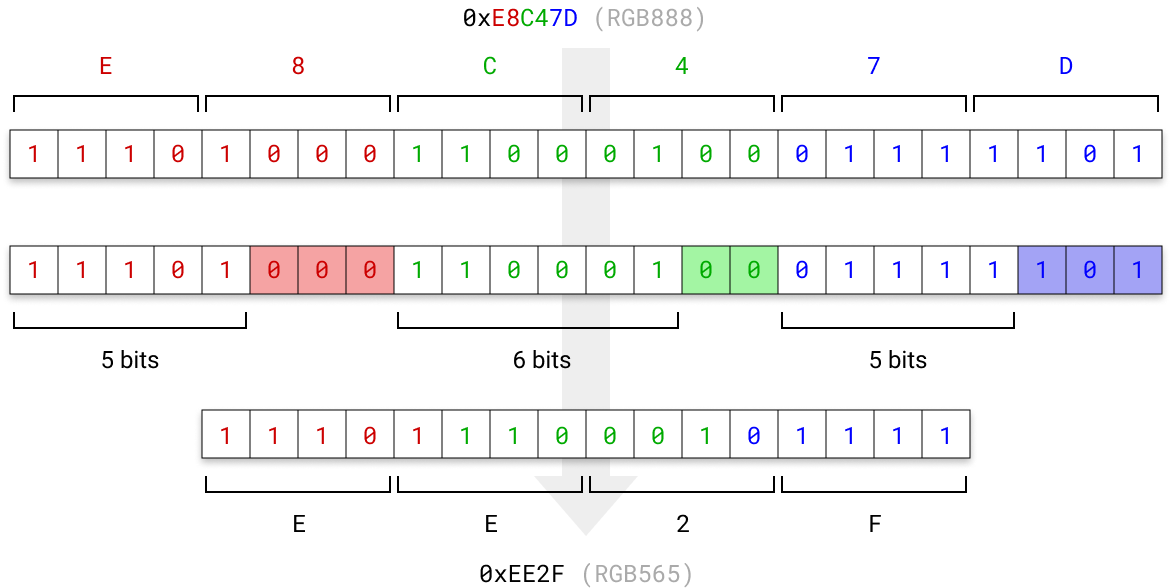
Converting RGB888 to RGB565
We obtain a sequence of 16 bits that we can then reinterpret as 2 pairs of 4 bits, that we just have to rewrite in their hexadecimal form… and the trick is done!
Now it’s your turn: try to convert each color in the palette to make sure you understand the conversion mechanism. To check your results, you can use the following converter (no need to prefix the value to be converted with # or 0x):
Once the calculations are done, you should get the following values:
![]()
Color palette in RGB565 format
Handling transparency
There is one last important point to be addressed to finalize our sprite, it is the transparency. Indeed, the frames that make up the sprite contain pixels to which we have not assigned any particular color. And for good reason, since these pixels must remain transparent when displayed. In other words, if the sprite is placed in the foreground of the display, as on a layer, it must be possible to distinguish what is “behind” it, in the transparent areas.
The gb.display API does not allow for fine-grained transparency level management, but considers a pixel to be either fully opaque or fully transparent. But even if this property remains rudimentary (and even binary in the sense of all or nothing), it is necessary to provide a way for gb.display to determine what should be considered transparent or not.
The solution is simple: you just have to apply a specific color (which will be considered as the transparency color) to the pixels that should be considered as transparent and that will not be displayed on the screen. This implies that this color should not be used as such on the sprite. It should only be used to characterize the transparent areas of the image. In general, a color is chosen that contrasts with the rest of the palette to distinguish it from other colors. Pink or green are commonly used to play this role. But you can choose the color that suits you.
Let’s take the pink 0xFF00FF which corresponds to 0xF81F in RGB565. Note that this color must be taken into account in the color palette, even if it will never be visible on the screen. So on a palette limited to 16 colors, for the indexed color display modes, this is very important, since you only have the other 15 to use on your graphic elements!
![]()
New colormap with its transparency color
All that remains is to export the sprite onto a single sheet (called a spritesheet), in PNG format for example, on which all the frames that make up the animation will be juxtaposed. Sprite creation software such as Piskel makes this export very easy:
Export you spritesheet with Piskel
You see that you can set the layout of the frames by specifying the number of columns or rows on which you want to distribute them. Here, I chose to export the board on 1 column of 4 rows. But you can choose the configuration you want.
![]()
Different layouts of the spritesheet
That’s it, our sprite is now finalized, but the work doesn’t stop here…
Tileset & Tile Mapping
In your game, you will also have to provide graphic elements to decorate the game scene. And these elements will not necessarily be animated like sprites. Most of them will even be static. Some elements will represent objects that your avatar may or may not interact with. Some objects will only be there to appear in the scenery. The scenery itself can be built with graphic elements that will be reused many times, such as walls, slabs, walkways, ladders, etc.:
Illustration of a relatively basic game scene
So you will have to prepare what are called tiles to cover your game scene according to the atmosphere you want to give it, and what your avatar will have to do there. This set of tiles is called a tileset, and the arrangement of these tiles on the game scene is called a tilemap.
The design of a tileset is based on the definition of the unit tiles from which we will build the whole scene. On the picture above, we can identify 4 elementary tiles of 16x8 pixels which are enough to build the whole scene:
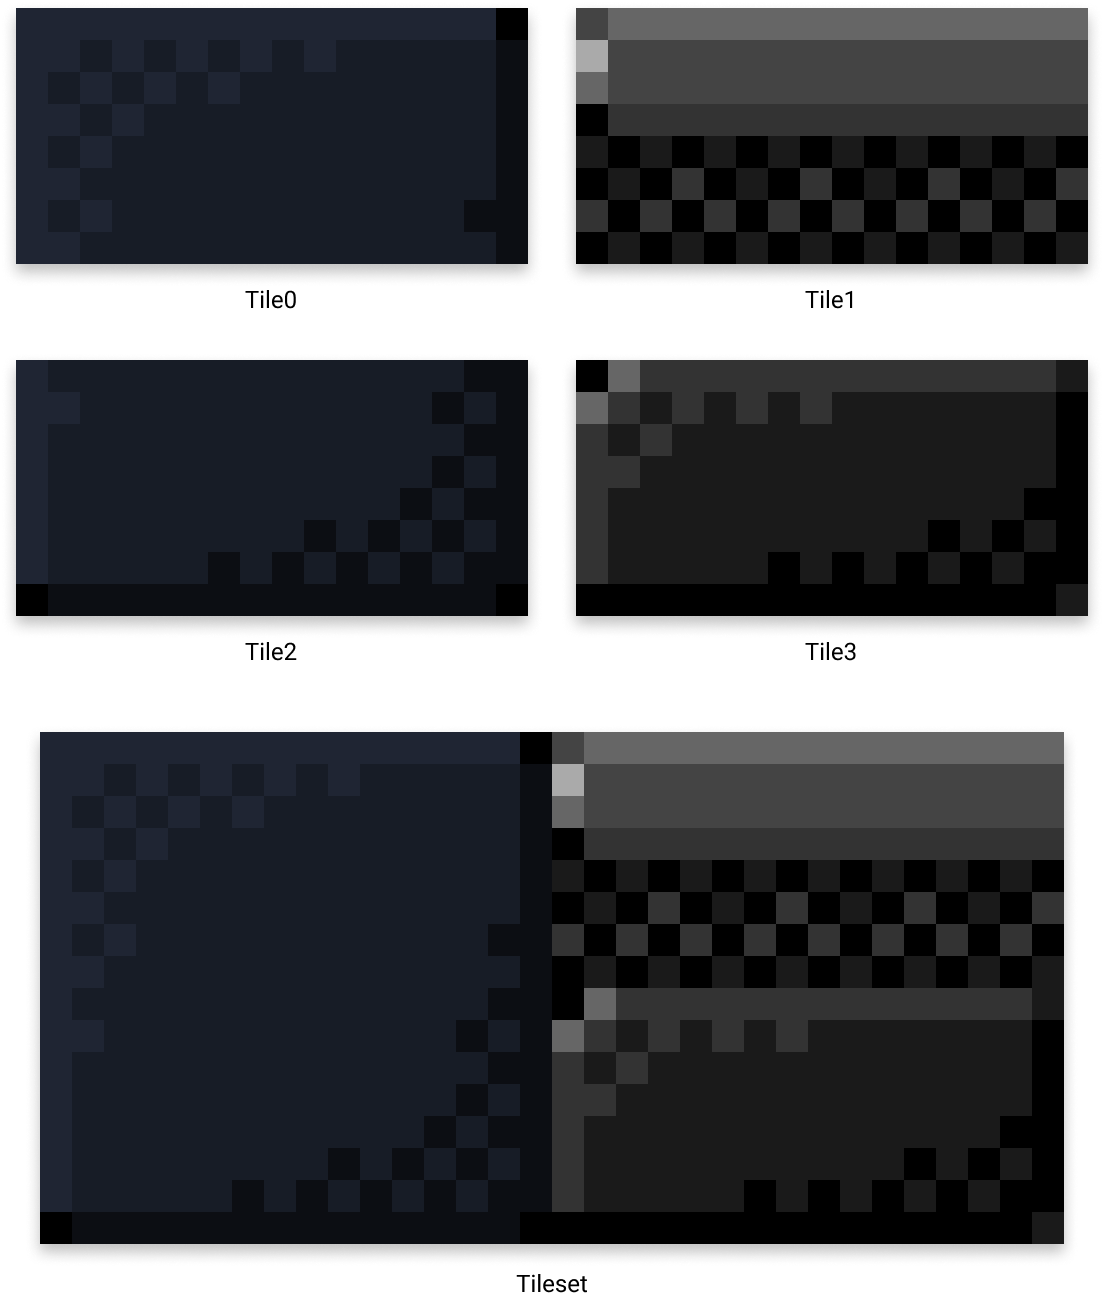
The tileset is arranged in exactly the same way as a spritesheet. In general, tiles that are adjacent on the tilemap are grouped together to better recognize the sets they form when assembled.
Final color palette
Taking into account the tileset has no importance from the point of view of colors with DISPLAY_MODE_RGB565, but it has much more in the case of the 16-color indexed display modes. So you have to make sure that the definition of all your sprites and tilesets does not involve more than 16 colors in total. This is the case here: I finally used only 15 colors in total. Here is the complete new color palette, which includes the sprite and tileset colors:
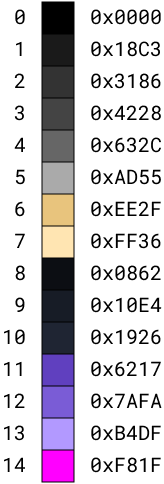
Game color palette
You will notice however that the color indexes of the pixels that make up the sprite are no longer the same with this new palette. I could have kept them the same, but I thought you’d like it if you had to recalculate the frames of the spritesheet… The motive here is purely pedagogical.
That’s it, all our graphic elements are defined. We then need to convert them into a format that we can use through programming to display them on the screen with gb.display, and this is what we will see in the next chapter.