Adding the ball to the stage
Now that the mechanics are well oiled, we can finally add objects to our game scene and contemplate all the preparation work we have just done!
So let’s start with our little marble. Remember that the game is governed by a main controller: GameEngine. He will therefore be in charge of placing the ball on the game scene:
#ifndef SHADING_EFFECT_GAME_ENGINE
#define SHADING_EFFECT_GAME_ENGINE

// we will define the `Ball` class just after....
#include "Ball.h"

class GameEngine
{
    private:

        // a pointer to the instance of the ball
        static Ball* ball;

    public:

        // initialization
        static void init();

        // entry point of the main control loop
        static void tick();
};

#endif
#include "GameEngine.h"
#include "Renderer.h"

// always initialize a pointer to NULL
Ball* GameEngine::ball = NULL;

void GameEngine::init() {
    // instantiation of the ball
    ball = new Ball();

    // registration of the ball as an observer
    // of the rendering engine
    Renderer::subscribe(ball);
}

void GameEngine::tick() {
    // performs rendering of the game scene
    Renderer::draw();
}
It’s very simple! There is nothing more to do outside the definition of the ball itself….
Preparation of graphic assets
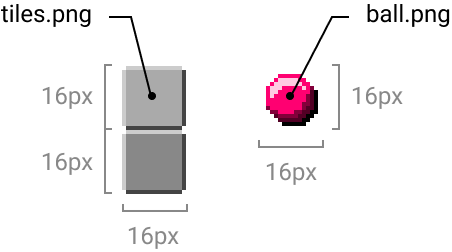
If you haven’t already done so, download the ZIP archive containing the graphic assets of the tutorial and take a look at the ball.png file:
Now is the time to integrate this image into our C++ code. How are we going to proceed? Remember that we will have to write the color codes of all the pixels that make up this ball in the buffer of the rendering engine. Be careful, the colorimetric reference of the file ball.png is the RGB888… but you will have to convert these colors to RGB565. And in addition, also remember that we will need to ensure that these color codes are written in the big-endian order before they are sent to the DMA controller. Damned!…. It’s not going to be easy! Well, it is! I published a small tool two weeks ago that will do it for you:
Image Transcoder for HD & gb.tft
Just setup the tool as follows, and drag and drop the ball.png file (on the tool page of course… not here !):
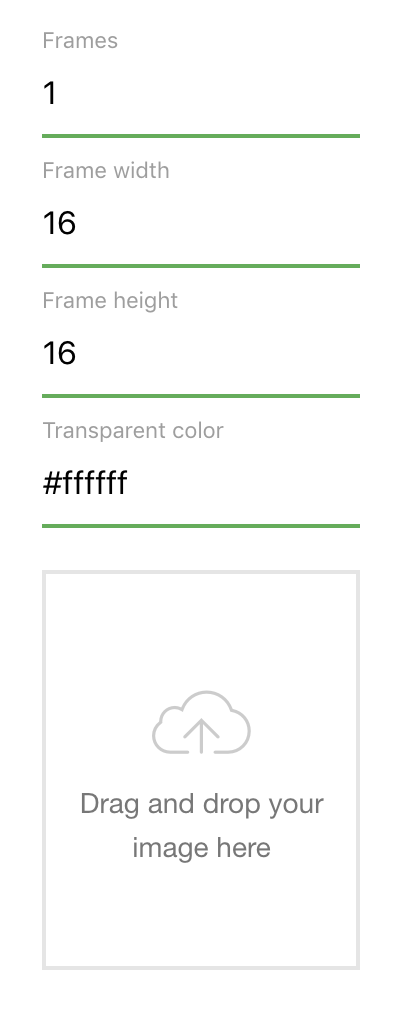
You will then get the following code:
// you can declare your sprites like this:

struct Sprite {
    int x, y;
    uint8_t width, height;
    uint8_t frames;
    uint16_t* data;
    uint16_t transparent;
};

// and after spritedata has been set
// you can initialize your sprite like that:
//
// Sprite mySprite = {
//     0, // choose an initial x value
//     0, // choose an initial y value
//     16,
//     16,
//     1,
//     (uint16_t*) &spritedata,
//     0xffff
// };

const uint16_t spritedata[] = {
    0xffff, 0xffff, 0xffff, 0xffff, 0xffff, 0xffff, 0xffff, 0xffff, 0xffff, 0xffff, 0xffff, 0xffff, 0xffff, 0xffff, 0xffff, 0xffff,
    0xffff, 0xffff, 0xffff, 0xffff, 0xffff, 0xffff, 0xffff, 0xffff, 0xffff, 0xffff, 0xffff, 0xffff, 0xffff, 0xffff, 0xffff, 0xffff,
    0xffff, 0xffff, 0xffff, 0xffff, 0xffff, 0x0ef8, 0x0ef8, 0x0ef8, 0x0ef8, 0x0ef8, 0x0ef8, 0xffff, 0xffff, 0xffff, 0xffff, 0xffff,
    0xffff, 0xffff, 0xffff, 0xffff, 0x0ef8, 0x5cfe, 0x5cfe, 0x5cfe, 0x5cfe, 0x5cfe, 0x0ef8, 0x0ef8, 0xffff, 0xffff, 0xffff, 0xffff,
    0xffff, 0xffff, 0xffff, 0x0ef8, 0x5cfe, 0x5cfe, 0x5cfe, 0x5cfe, 0x5cfe, 0x5cfe, 0x5cfe, 0x0ef8, 0x0ef8, 0xffff, 0xffff, 0xffff,
    0xffff, 0xffff, 0x0ef8, 0x5cfe, 0x5cfe, 0x5cfe, 0x0ef8, 0x0ef8, 0x0ef8, 0x0ef8, 0x0ef8, 0x5cfe, 0x0ef8, 0x0780, 0xffff, 0xffff,
    0xffff, 0xffff, 0x0ef8, 0x5cfe, 0x5cfe, 0x0ef8, 0x0ef8, 0x0ef8, 0x0ef8, 0x0ef8, 0x0ef8, 0x0ef8, 0x0ef8, 0x0450, 0x0000, 0xffff,
    0xffff, 0xffff, 0x0ef8, 0x5cfe, 0x0ef8, 0x0ef8, 0x0ef8, 0x0ef8, 0x0ef8, 0x0ef8, 0x0ef8, 0x0ef8, 0x0780, 0x0450, 0x0000, 0xffff,
    0xffff, 0xffff, 0x0ef8, 0x0ef8, 0x0ef8, 0x0ef8, 0x0ef8, 0x0ef8, 0x0ef8, 0x0ef8, 0x0ef8, 0x0ef8, 0x0780, 0x0450, 0x0000, 0xffff,
    0xffff, 0xffff, 0x0ef8, 0x0ef8, 0x0ef8, 0x0ef8, 0x0ef8, 0x0ef8, 0x0ef8, 0x0ef8, 0x0ef8, 0x0780, 0x0780, 0x0450, 0x0000, 0xffff,
    0xffff, 0xffff, 0x0780, 0x0ef8, 0x0ef8, 0x0ef8, 0x0ef8, 0x0ef8, 0x0ef8, 0x0ef8, 0x0ef8, 0x0780, 0x0450, 0x0450, 0x0000, 0xffff,
    0xffff, 0xffff, 0xffff, 0x0780, 0x0780, 0x0ef8, 0x0ef8, 0x0ef8, 0x0ef8, 0x0780, 0x0780, 0x0450, 0x0450, 0x0000, 0x0000, 0xffff,
    0xffff, 0xffff, 0xffff, 0xffff, 0x0450, 0x0780, 0x0780, 0x0780, 0x0780, 0x0780, 0x0450, 0x0450, 0x0000, 0x0000, 0xffff, 0xffff,
    0xffff, 0xffff, 0xffff, 0xffff, 0xffff, 0x0450, 0x0450, 0x0450, 0x0450, 0x0450, 0x0450, 0x0000, 0x0000, 0xffff, 0xffff, 0xffff,
    0xffff, 0xffff, 0xffff, 0xffff, 0xffff, 0xffff, 0x0000, 0x0000, 0x0000, 0x0000, 0x0000, 0x0000, 0xffff, 0xffff, 0xffff, 0xffff,
    0xffff, 0xffff, 0xffff, 0xffff, 0xffff, 0xffff, 0xffff, 0xffff, 0xffff, 0xffff, 0xffff, 0xffff, 0xffff, 0xffff, 0xffff, 0xffff
};
The part we are interested in here is the definition of the spritedata constant, which we will copy in our Ball class. I chose an arbitrary transparent color that is not part of the colors I used to draw the ball. I chose the white (#ffffff), but you can quite choose the one you want… apart from those used to draw the ball!
Let’s just take a moment to look at these color codes. Take for example, the flashy pink of our marble. Its color code is #FF0071 in RGB888 and #F80E in RGB565. You can notice that this color code is replaced by the integer 0x0ef8 in the definition of spritedata… which means that it has been rewritten in the little-endian order…
Uuuuuuuhhh…???…???… yes, but you told us we had to write it in big-endian because the TFT screen eats big-endian!!!???…
LOL! It also confused me at first! But Soru gave me the explanation: insofar as the processor eats little-endian, the C++ compiler converts the constants you define in your code (which are written in big-endian which is the natural order in which we write things) to little-endian… so if you define a constant with a little-endian writing… well it will be reversed and thus converted into big-endian. And that’s exactly what we want because that’s what the processor will throw at the DMA controller. This is why the color codes obtained are well written in little-endian. You should have thought of that, huh?!
Come on, we can continue…
Definition of the ball
Let’s start by declaring the Ball class:
#ifndef SHADING_EFFECT_BALL
#define SHADING_EFFECT_BALL

#include "Renderable.h"

// here is how to declare the fact that the `Ball` class
// fulfills the contract defined by the `Renderable` interface
// (which is actually a class)
class Ball : public Renderable
{
    private:

        // the descriptive parameters of the sprite
        static const uint8_t FRAME_WIDTH;
        static const uint8_t FRAME_HEIGHT;
        static const uint16_t TRANSPARENT_COLOR;
        // the pixel map obtained with the transcoding tool
        static const uint16_t BITMAP[];

        // the coordinates of the ball, which are constant
        // since the ball is fixed in the center of the screen
        static const uint8_t X_POS;
        static const uint8_t Y_POS;

    public:

        // a destructor must be declared here to
        // avoid potential memory leaks
        ~Ball();

        // the famous method of fulfilling the `Renderable` contract
        void draw(uint8_t sliceY, uint8_t sliceHeight, uint16_t* buffer) override;
};

#endif
The declaration that the Ball class fulfills the contract defined by the Renderable interface is made through the inheritance in C++. Remember that the notion of interface in the strict sense of the term does not exist here. And it is by using the multiple inheritance of C++ that you can make your classes implement multiple interfaces, deriving from multiple classes that define different contracts.
You will notice that it is imperative here to provide a destructor. Indeed, in general, derived classes can allocate memory or contain references to other resources that will have to be cleaned up when the object is destroyed. If you do not define a destructor here, when the Ball instance is destroyed, it may be seen simply as a Renderable instance, in which case the destructor of the Ball class will never be invoked. And so all the resources it refers to will not be cleaned, and the memory it has allocated will not be released. This will cause memory leaks!
Well, let’s now move on to the definition of our Ball class:
#include <Gamebuino-Meta.h>
#include "Ball.h"
#include "constants.h"

// we copy the descriptive parameters of our sprite
const uint8_t Ball::FRAME_WIDTH = 16;
const uint8_t Ball::FRAME_HEIGHT = 16;
const uint16_t Ball::TRANSPARENT_COLOR = 0xffff;
// the ball is positioned in the center of the screen...
// note that these coordinates correspond to the corner
// at the top left of our sprite
const uint8_t Ball::X_POS = (SCREEN_WIDTH - FRAME_WIDTH) / 2;
const uint8_t Ball::Y_POS = (SCREEN_HEIGHT - FRAME_HEIGHT) / 2;

// we copy the value of the variable `spritedata`
// that the transcoding tool provided us with
const uint16_t Ball::BITMAP[] = {
    0xffff, 0xffff, 0xffff, 0xffff, 0xffff, 0xffff, 0xffff, 0xffff, 0xffff, 0xffff, 0xffff, 0xffff, 0xffff, 0xffff, 0xffff, 0xffff,
    0xffff, 0xffff, 0xffff, 0xffff, 0xffff, 0xffff, 0xffff, 0xffff, 0xffff, 0xffff, 0xffff, 0xffff, 0xffff, 0xffff, 0xffff, 0xffff,
    0xffff, 0xffff, 0xffff, 0xffff, 0xffff, 0x0ef8, 0x0ef8, 0x0ef8, 0x0ef8, 0x0ef8, 0x0ef8, 0xffff, 0xffff, 0xffff, 0xffff, 0xffff,
    0xffff, 0xffff, 0xffff, 0xffff, 0x0ef8, 0x5cfe, 0x5cfe, 0x5cfe, 0x5cfe, 0x5cfe, 0x0ef8, 0x0ef8, 0xffff, 0xffff, 0xffff, 0xffff,
    0xffff, 0xffff, 0xffff, 0x0ef8, 0x5cfe, 0x5cfe, 0x5cfe, 0x5cfe, 0x5cfe, 0x5cfe, 0x5cfe, 0x0ef8, 0x0ef8, 0xffff, 0xffff, 0xffff,
    0xffff, 0xffff, 0x0ef8, 0x5cfe, 0x5cfe, 0x5cfe, 0x0ef8, 0x0ef8, 0x0ef8, 0x0ef8, 0x0ef8, 0x5cfe, 0x0ef8, 0x0780, 0xffff, 0xffff,
    0xffff, 0xffff, 0x0ef8, 0x5cfe, 0x5cfe, 0x0ef8, 0x0ef8, 0x0ef8, 0x0ef8, 0x0ef8, 0x0ef8, 0x0ef8, 0x0ef8, 0x0450, 0x0000, 0xffff,
    0xffff, 0xffff, 0x0ef8, 0x5cfe, 0x0ef8, 0x0ef8, 0x0ef8, 0x0ef8, 0x0ef8, 0x0ef8, 0x0ef8, 0x0ef8, 0x0780, 0x0450, 0x0000, 0xffff,
    0xffff, 0xffff, 0x0ef8, 0x0ef8, 0x0ef8, 0x0ef8, 0x0ef8, 0x0ef8, 0x0ef8, 0x0ef8, 0x0ef8, 0x0ef8, 0x0780, 0x0450, 0x0000, 0xffff,
    0xffff, 0xffff, 0x0ef8, 0x0ef8, 0x0ef8, 0x0ef8, 0x0ef8, 0x0ef8, 0x0ef8, 0x0ef8, 0x0ef8, 0x0780, 0x0780, 0x0450, 0x0000, 0xffff,
    0xffff, 0xffff, 0x0780, 0x0ef8, 0x0ef8, 0x0ef8, 0x0ef8, 0x0ef8, 0x0ef8, 0x0ef8, 0x0ef8, 0x0780, 0x0450, 0x0450, 0x0000, 0xffff,
    0xffff, 0xffff, 0xffff, 0x0780, 0x0780, 0x0ef8, 0x0ef8, 0x0ef8, 0x0ef8, 0x0780, 0x0780, 0x0450, 0x0450, 0x0000, 0x0000, 0xffff,
    0xffff, 0xffff, 0xffff, 0xffff, 0x0450, 0x0780, 0x0780, 0x0780, 0x0780, 0x0780, 0x0450, 0x0450, 0x0000, 0x0000, 0xffff, 0xffff,
    0xffff, 0xffff, 0xffff, 0xffff, 0xffff, 0x0450, 0x0450, 0x0450, 0x0450, 0x0450, 0x0450, 0x0000, 0x0000, 0xffff, 0xffff, 0xffff,
    0xffff, 0xffff, 0xffff, 0xffff, 0xffff, 0xffff, 0x0000, 0x0000, 0x0000, 0x0000, 0x0000, 0x0000, 0xffff, 0xffff, 0xffff, 0xffff,
    0xffff, 0xffff, 0xffff, 0xffff, 0xffff, 0xffff, 0xffff, 0xffff, 0xffff, 0xffff, 0xffff, 0xffff, 0xffff, 0xffff, 0xffff, 0xffff
};

// a destructor must be defined here to
// avoid potential memory leaks
Ball::~Ball() {
    // he's not doing anything special here,
    // but it's important to think about it!
}

// and we define the method of calculating the rendering of the ball
void Ball::draw(uint8_t sliceY, uint8_t sliceHeight, uint16_t* buffer) {
    // the portion of the sprite which is located within
    // the current slice is determined along the Y axis
    int8_t startIndex = Y_POS <= sliceY ? 0 : Y_POS - sliceY;
    int8_t endIndex = Y_POS + FRAME_HEIGHT >= sliceY + sliceHeight ? sliceHeight - 1 : Y_POS + FRAME_HEIGHT - sliceY - 1;
    // we prepare a variable that will receive in turn the color codes
    // of each of the pixels that make up the sprite (in the current slice)
    uint16_t value;
    // coordinates of the processed pixel
    uint8_t x,y;
    // now we go through the portion of the sprite that is in the slice
    // along the Y axis...
    for (y = startIndex; y <= endIndex; y++) {
        // and the X axis
        for (x = X_POS; x < X_POS + FRAME_WIDTH; x++) {
            // we will pick the color of the corresponding pixel
            value = BITMAP[x - X_POS + (y + sliceY - Y_POS) * FRAME_WIDTH];
            // and if it is not the transparent color
            if (value != TRANSPARENT_COLOR) {
                // we copy it into the buffer
                buffer[x + y * SCREEN_WIDTH] = value;
            }
        }
    }
}
First rendering of the scene
Well, that’s fine! All you have to do is compile and upload all this on the META to finally see something appear on the screen…
WTF???
LOL! It’s about the face I had at the first execution…
But the explanation is simple… an idea?
In fact, take a good look at the code of the draw() rendering method:
- of the ball
- and the rendering engine
Where do you see something written in the buffer? We do this exclusively in the ball rendering method… and only for pixels whose color is not the transparent one…
You still don’t see? Let’s take a closer look at what’s really going on…
The rendering surface is cut into 128 / 8 = 16 slices:
| slice | buffer | writing | resulting state of the buffer |
|---|---|---|---|
| #1 | buffer1 |
we don’t write anything | only zeros |
| #2 | buffer2 |
we don’t write anything | only zeros |
| #3 | buffer1 |
we don’t write anything | only zeros |
| #4 | buffer2 |
we don’t write anything | only zeros |
| #5 | buffer1 |
we don’t write anything | only zeros |
| #6 | buffer2 |
we don’t write anything | only zeros |
| #7 | buffer1 |
we don’t write anything | only zeros |
| #8 | buffer2 |
upper half of the ball | upper half of the ball |
| #9 | buffer1 |
lower half of the ball | lower half of the ball |
| #10 | buffer2 |
we don’t write anything | upper half of the ball |
| #11 | buffer1 |
we don’t write anything | lower half of the ball |
| #12 | buffer2 |
we don’t write anything | upper half of the ball |
| #13 | buffer1 |
we don’t write anything | lower half of the ball |
| #14 | buffer2 |
we don’t write anything | upper half of the ball |
| #15 | buffer1 |
we don’t write anything | lower half of the ball |
| #16 | buffer2 |
we don’t write anything | upper half of the ball |
Well that’s what happens… and on the second pass, the buffer is no longer empty, so the ball halves are drawn on all the slices… alternately… indefinitely…. And when we go back to the slice where the ball must actually be drawn, well, we rewrite exactly the same thing into the buffers… So nothing changes on the display….
The first reflex is to say to yourself: “oh well, let’s just write zeros instead of nothing at all“… if the ball was alone on the game scene, that’s indeed what we could do… but the problem is, it’s not alone! And by doing this, you would delete all the pixels of the objects that would have been drawn before.
On the other hand, the chance we have in this story is that we still have to render the tiling… which covers the entire surface of the screen… so the problem will be fixed. Indeed, the tiling is located at a deeper depth on the display stack, so it will be drawn before the ball… Therefore, it will cover the entire black surface, and the slices will always be filled with its pixels… whether you draw the ball or not.
Now let’s go to the next chapter to tackle the rendering of the tiling!