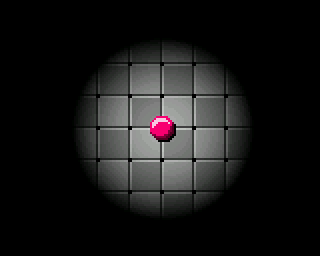
User event management
We must intercept events when the user presses the console buttons in order to initiate a movement at the ball. And since the ball remains in the center of the screen as if it were followed by a camera, the illusion of motion will be given by the relative motion of its environment, i. e. the tiling. Remember that we have already provided in the tiling rendering calculation a displacement vector (offsetX, offsetY). Well, it is precisely this vector that we will now calculate to handle the impression of motion.
Let’s start by setting up the necessary elements for intercepting user events. To simplify things, we will do it directly within the GameEngine:
void GameEngine::tick() {

    // interception of user events

    if (gb.buttons.repeat(BUTTON_LEFT, 1)) {
        tiling->left();
    }

    if (gb.buttons.repeat(BUTTON_RIGHT, 1)) {
        tiling->right();
    }

    if (gb.buttons.repeat(BUTTON_UP, 1)) {
        tiling->up();
    }

    if (gb.buttons.repeat(BUTTON_DOWN, 1)) {
        tiling->down();
    }

    // the calculation of the motio is then delegated to the tiling
    // so we're going to add a control loop to it
    // to perform these calculations
    tiling->tick();

    // performs rendering of the game scene
    Renderer::draw();
}
Kinematics
The motion management is relatively simple. We will rely on kinematics principles. I refer you to your physics lectures for theoretical details… but, in essence, we will simply retain the following principles here:
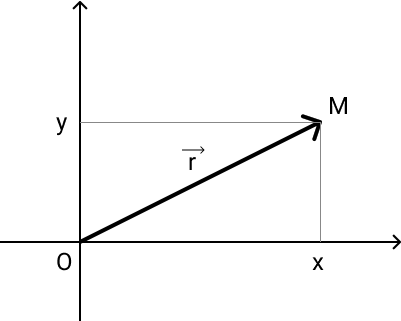
- If we consider a spatial reference system having as its origin the point of coordinates , and by reference to which we study the motion of a material point . The position of at time is given by the vector position (or ) of coordinates .
- The average speed between two successive positions and of the material point is defined as the ratio between the distance travelled and the duration between these two moments. It is a scalar quantity. By considering increasingly close moments, and thus by passing to the limit , we can define an instantaneous vector variable called velocity vector and defined by the time derivative of the position vector:
- In the same way we can define the acceleration vector defined by the time derivative of the velocity vector:
These equations are very useful… but for there to be motion, we must also introduce the notion of dynamics based on mechanical forces…
Fundamental principle of dynamics
This principle refers to a physical law relating the mass of an object to the acceleration it receives if forces are applied to it. It is also called Newton’s second law or fundamental relationship of dynamics, and it is stated as follows:
Let be a body of constant non-zero mass $, the acceleration undergone by this body in a Galilean reference system is proportional to the resultant of the forces it undergoes, and inversely proportional to its mass :
Not too much of a headache?….. … no, it’s not that bad, come on. You will see that all this will be translated in a very simple way into our code.
Motion management
We now have all the mathematical and physical keys to implement the motion of our ball, transposed on the motion of the tiling to simulate the tracking of a camera.
To avoid using trigonometric calculations, which would be more expensive for the processor, which is already well occupied with the scene rendering, we will decide to represent our vectors (position, speed and acceleration) by their respective coordinates (i.e. by projecting them on the X and Y axes), and we will simplify (drastically) the fundamental relationship of the dynamics. To do this, we will agglomerate the mass of the ball as well as the sum of the forces applied to it in the form of a simple constant driving impulse PULSE=1 that we will assign as it is to the coordinates ax and ay of the acceleration vector. You can see that we’re not going to do lace… but it will greatly simplify the calculations and relieve the processor.
Now let’s inject all these ideas into the code of the Tiling class:
#ifndef SHADING_EFFECT_TILING
#define SHADING_EFFECT_TILING

#include "Renderable.h"

// the constant driving impulse
#define PULSE 1

class Tiling : public Renderable
{
    private:

        static const uint8_t TILE_WIDTH;
        static const uint8_t TILE_HEIGHT;
        static const uint16_t TRANSPARENT_COLOR;
        static const uint16_t BITMAP[];

        // the coordinates of the acceleration vector
        float ax,ay;

        // the coordinates of the velocity vector
        float vx,vy;

        // the coordinates of the position vector are no other than
        // than those of our displacement vector
        int8_t offsetX,offsetY;

    public:

        // the constructor will now have to initialize all vectors
        Tiling();
        ~Tiling();

        // the move commands invoked by `GameEngine`
        void left();
        void right();
        void up();
        void down();

        // the connection point of the control loop
        void tick();

        void draw(uint8_t sliceY, uint8_t sliceHeight, uint16_t* buffer) override;
};

#endif
Now let’s see how to define the new elements we have introduced:
// the constructor has to initialize:
// - the acceleration vector
// - the veolcity vector
// - the displacement vector
Tiling::Tiling() {
    this->ax = 0;
    this->ay = 0;
    this->vx = 0;
    this->vy = 0;
    this->offsetX = 0;
    this->offsetY = 0;
}

// the fundamental relationship of dynamics applies
// here in a very simpl way :-)

void Tiling::left() {
    this->ax = -PULSE;
}

void Tiling::right() {
    this->ax = PULSE;
}

void Tiling::up() {
    this->ay = -PULSE;
}

void Tiling::down() {
    this->ay = PULSE;
}

// connection to the control loop
// is an opportunity to apply our motion equations

void Tiling::tick() {
    // the velocity vector is directly derived
    // from the acceleration vector
    this->vx += this->ax;
    this->vy += this->ay;

    // the displacement vector is directly derived
    // from the velocity vector
    this->offsetX += this->vx;
    this->offsetY += this->vy;

    // !watch out here!
    // remember that acceleration is an INSTANT value
    // so once it's been applied to the velocity vector,
    // you must reset it to zero!
    this->ax = 0;
    this->ay = 0;
}
Okay! Go ahead! Compile… upload the binary to the META… and test it!… What do you notice? Doesn’t the motion of the ball seem strange to you? For example, give small impulses always in the same direction… you see that the speed of the ball increases and only increases, unless you apply a contrary force to it by giving it an impulse in the opposite direction, which will have the effect of braking it… until its movement is reversed. And then it will continue to increase again in this new direction.
What’s going on? Well, everything is going fine! Believe me! But I have not yet told you about another fundamental principle of Newtonian physics: inertia.
Principle of inertia
In physics, the inertia of a body, in a Galilean reference system (known as inertial), is its tendency to maintain its speed: in the absence of external influence, any point body persists in a uniform rectilinear movement. Inertia is also called the principle of inertia, or law of inertia, and, since Newton, Newton’s first law.
The law of inertia expresses the fact that if the speed of the point body with respect to the Galilean reference point is constant, “the sum of the forces acting on the body is zero”:
Do you understand now? This is the reason why the speed of the ball never slows down (unless a force opposite to the direction of its motion is applied). It is quite simply the principle of inertia that is at work in our modeling. Also, to add more realism to our game scene, we could consider that the tiling on which the ball moves induces friction forces on the ball. In physics, friction is an interaction that opposes the relative motion between two systems in contact. In other words, the tiling (which is fixed) interacts with the ball in such a way as to oppose its movement. This simply means that this interaction can be roughly modelled by a weakening of the velocity vector of the ball. If we now consider that the ball is fixed (since it is followed by the camera), it is the tiling that moves relatively to the ball. As a result, friction causes the tiling speed to decrease relatively to the ball.
How can we simply weaken this speed? Well, just multiply it (at each cycle of the control loop) by a factor smaller than 1. Yes, it’s as simple as that . And the closer this factor is to zero, the more abrupt the slowdown will be. We will decide (arbitrarily) here to assign the value 0.9 to our friction factor.
Let’s now integrate this new phenomenon into our equations:
void Tiling::tick() {
    this->vx += this->ax;
    this->vy += this->ay;
    this->offsetX += this->vx;
    this->offsetY += this->vy;
    this->ax = 0;
    this->ay = 0;

    // application of the friction phenomenon:
    this->vx *= .9;
    this->vy *= .9;

    // and we can also decide that when the components
    // of the velocity become less than 0.5 (in absolute values),
    // then we can consider that they simply cancel each other out
    if (this->vx > -.5 && this->vx < .5) { this->vx = 0; }
    if (this->vy > -.5 && this->vy < .5) { this->vy = 0; }
}
And here we are… you can now compile and test the application… you see that it’s still much better! We now get a much more realistic motion, don’t we?
Although we have discussed some theoretical physical and mathematical principles that now allow you to understand WHY and HOW to implement realistic motion in your applications, you can see that the application of these principles in the code is not so complicated.
Come on, we’ll finally be able to move on to the long-awaited technique of applying shading effects to your game scenes. Let’s jump to the next chapter….