And the light was
We are finally getting to the heart of the matter of this tutorial. Our aim, through this chapter will be to plunge the game scene into the darkness and to illuminate the ball with a halo of light to distinguish only its close vicinity. This lighting effect can give a very nice atmosphere to your games. What is remarkable here is that we have the full range of colours offered by the RGB565 repository. It is clear that if we only had the 16 colors permitted by the default DISPLAY_MODE_MODE_INDEX when developing a high resolution application with META, we would be very frustrated, because such an effect would certainly not have the same look. It might even be impossible to implement if your sprites already use even a few colors…
The challenge for us here is to find a way to create shade from a fully lit scene like the one we have developed so far. So the question is “how to do shadow with simple pixels”? Well, just “darken them”! That is to say, to play on the level of luminosity of the pixel color.
The colorimetric model we have at our disposal is the RGB565 one. In other words, colors are made from three primary colors: red (5-bit), green (6-bit) and blue (5-bit), whose intensity levels can be set independently of each other. For example, if I give you the ORANGE color defined in the official palette of the library and that I ask you to darken it by decreasing its brightness by 50%… How to do this? Let’s take a closer look at the coding of this color in the two referentials RGB888 and RGB565:
| Color | R8 | G8 | B8 | RGB888 | RGB565 | R5 | G6 | B5 |
|---|---|---|---|---|---|---|---|---|
| ORANGE | 255 | 168 | 17 | #FFA811 |
0xFD42 |
31 | 42 | 2 |
Decreasing the brightness of this color by 50% is simply dividing by 2 each of the intensity levels of its 3 primary colors (we will round to the nearest integer when the division is not integer):
| Color | R8 | G8 | B8 | RGB888 | RGB565 | R5 | G6 | B5 |
|---|---|---|---|---|---|---|---|---|
| ORANGE | 255 | 168 | 17 | #FFA811 |
0xFD42 |
31 | 42 | 2 |
| dark ORANGE | 128 | 84 | 9 | #805409 |
0x82A1 |
16 | 21 | 1 |
This results in 2 levels of brightness evenly distributed between the reference color and the black color (where the brightness is zero).
Indeed, if we subtract from the intermediate shade the equivalent of 50% of the luminosity of the reference shade, we fall back on black.
Generally speaking, to obtain brightness levels for of a reference tint , we can define the following relationships:
Do you understand the principle? Ok, so if you now want to generate 8 levels of brightness, just apply these pretty little formulas to quickly get the next palette (including black as 9th color):
| I'll let you do the math | ||||||||
You can see it’s relatively simple, can’t you? Well… How are we going to apply this principle to our game scene, so as to create this halo of light around our little ball?
Well, we just have to pick the color code of the pixel in the spritesheet of the tiling, exactly as we have done so far, and depending on the distance that separates this pixel from the center of the ball, that is to say from the center of the screen, we will assign it a brightness level. It’s as simple as that.
Preparations for performance measurement
But first, we will add a few lines in the sketch of our application to measure the CPU load and available memory space, to observe the impact of the brightness calculation on performance at runtime.
#include <Gamebuino-Meta.h>
#include "GameEngine.h"

void setup() {
    gb.begin();

    // serial port initialization
    SerialUSB.begin(9600);

    gb.display.init(0, 0, ColorMode::rgb565);
    GameEngine::init();
}

void loop() {
    while(!gb.update());

    // measure the CPU load every second (we are at 25 fps by default)
    // and send the data to the serial port
    if (gb.frameCount % 25 == 0) {
        SerialUSB.printf("CPU: %i, RAM: %i\n", gb.getCpuLoad(), gb.getFreeRam());
    }

    GameEngine::tick();
}
Connect your META to a USB port on your computer, then open the serial port in Arduino IDE (note that the port ID will probably be different for you):

Then run the execution to observe how things are going until we do something about the brightness calculation…. You should get something like that:
[Starting] Opening the serial port - /dev/cu.usbmodem141401
[Info] Opened the serial port - /dev/cu.usbmodem141401
CPU: 82, RAM: 9755
CPU: 82, RAM: 9755
CPU: 82, RAM: 9755
The CPU is already at 82% of load! Obviously… we draw a lot of pixels… and for each pixel, we do a lot of calculations finally. As a reminder, here is the code of our draw() method, cleared of all its comments:
void Tiling::draw(uint8_t sliceY, uint8_t sliceHeight, uint16_t* buffer) {
    bool txodd,tyodd,jump;
    uint8_t sy,x,y, xo,yo;
    uint16_t syw,index,value,index_y;
    uint16_t nfo = TILE_WIDTH * TILE_HEIGHT;
    for (sy = 0; sy < sliceHeight; sy++) {
        syw = sy * SCREEN_WIDTH;
        y = sliceY + sy;
        yo = y + this->offsetY;
        tyodd = (yo / TILE_HEIGHT) % 2;
        index_y = (yo % TILE_HEIGHT) * TILE_WIDTH;
        for (x = 0; x < SCREEN_WIDTH; x++) {
            xo = x + this->offsetX;
            txodd = (xo / TILE_WIDTH) % 2;
            jump = txodd ^ tyodd;
            index = index_y + (xo % TILE_WIDTH) + (jump * nfo);
            value = BITMAP[index];
            buffer[x + syw] = value != TRANSPARENT_COLOR ? value : 0;
        }
    }
}
First implementation of the shading
Let’s start by declaring two constants in Tiling.h:
class Tiling
{
    private:

        // the square of the halo radius
        static const uint16_t HALO_RADIUS2;

        // the number of brightness levels
        static const uint8_t BRIGHTNESS_LEVELS;

    // the rest of the declarations remain unchanged
};
You can see that we will characterize the halo of light by the square of its radius. Indeed, since we will have to calculate distances, to avoid unnecessary overloading of the CPU we will work with the square of these distances, so as to avoid having to use the sqrt() function which allows to calculate the square root of a number, but which would cause performance to collapse. We would prefer to work directly on the squares.
Let’s now define these two constants:
const uint16_t Tiling::HALO_RADIUS2 = 0b1<<11;
const uint8_t Tiling::BRIGHTNESS_LEVELS = 4;
You will notice, that for each of them, we have chosen a value that is a power of 2: 0b1<<<11 = = 2048, in other words, the halo radius will extend over = about 45 pixels, and we want to display here 4 = brightness levels.
Let’s now see how to modify our draw() method so that it takes these brightness levels into account in its rendering calculation:
void Tiling::draw(uint8_t sliceY, uint8_t sliceHeight, uint16_t* buffer) {
    bool txodd,tyodd,jump;
    uint16_t nfo = TILE_WIDTH * TILE_HEIGHT;
    uint8_t sy,x,y;
    uint8_t xo,yo;
    uint16_t syw;
    uint16_t index, value;
    uint16_t index_y;

    // we will need to measure the square of the distance `r2`
    // between the pixel of the tiling and the center of the screen....
    // an intermediate calculation will determine
    // the Y component of `r2` that will be named `ry2`
    uint16_t r2,ry2;
    uint8_t hsw = SCREEN_WIDTH / 2;
    uint8_t hsh = SCREEN_HEIGHT / 2;

    // to perform the brightness calculations, we will
    // need to isolate the red, green and blue components
    // from the RGB565 color code of the pixel to be processed
    uint16_t red, green, blue;

    // we will then calculate the brightness level of the pixel
    // as a function of the ratio between the square of the distance `r2`
    // which separates it from the center of the screen
    // and the square of the  halo radius `HALO_RADIUS2`
    uint16_t lux;

    // this variable will allow us to perform the calculations
    // on the color to be transformed so that it
    // integrates brightness data
    uint16_t color;

    for (sy = 0; sy < sliceHeight; sy++) {
        syw = sy * SCREEN_WIDTH;
        y = sliceY + sy;
        yo = y + this->offsetY;
        tyodd = (yo / TILE_HEIGHT) % 2;
        index_y = (yo % TILE_HEIGHT) * TILE_WIDTH;

        // the Y component of the square of the distance that
        // separates the pixel from the center of the screen
        // is calculated
        ry2 = (y - hsh) * (y - hsh);

        for (x = 0; x < SCREEN_WIDTH; x++) {
            xo = x + this->offsetX;
            txodd = (xo / TILE_WIDTH) % 2;
            jump = txodd ^ tyodd;
            index = index_y + (xo % TILE_WIDTH) + (jump * nfo);

            // we calculate the square of the distance between
            // the pixel and the center of the screen
            r2 = (x - hsw) * (x - hsw) + ry2;

            // we plunge the tile into darkness by default
            value = 0;

            // and when we are inside the halo
            if (r2 <= HALO_RADIUS2) {
                // we get the color code of the tile's sprite
                color = BITMAP[index];

                // if it is not the transparent color
                if (color != TRANSPARENT_COLOR) {
                    // the brightness level is calculated at this distance
                    lux = BRIGHTNESS_LEVELS - BRIGHTNESS_LEVELS * r2 / HALO_RADIUS2;

                    // we rewrite the color code in big-endian
                    color = ((color & 0xff) << 8) | (color >> 8);

                    // then we pick the intensity levels
                    // of the 3 primary colors
                    red   = color >> 11;
                    green = (color >> 5) & 0b111111;
                    blue  = color & 0b11111;

                    // the brightness level is applied
                    // to each of the primary colors
                    red   = red   * lux / BRIGHTNESS_LEVELS;
                    green = green * lux / BRIGHTNESS_LEVELS;
                    blue  = blue  * lux / BRIGHTNESS_LEVELS;

                    // then we recompose the RGB565 color code
                    value = (red << 11) | (green << 5) | blue;

                    // and we rewrite it in little-endian
                    value = ((value & 0xff) << 8) | (value >> 8);
                }
            }

            // all that remains is to copy the color code
            // into the buffer
            buffer[x + syw] = value;
        }
    }
}
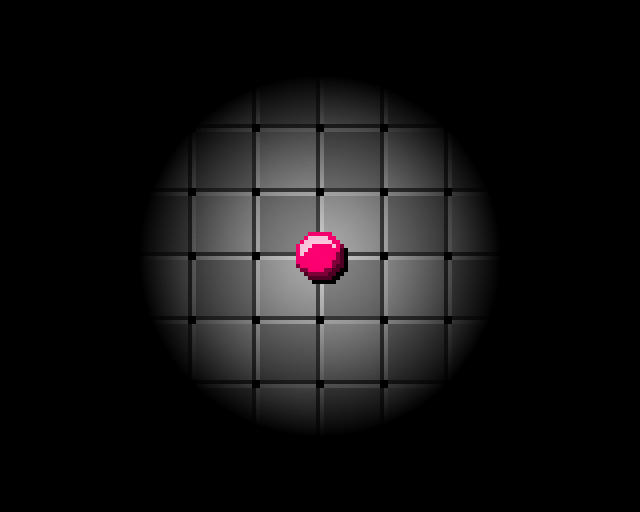
Go ahead, you can compile and test it! You should get something like that:
Of course, with only 4 levels of luminosity, it’s pretty ugly… but it allows you to visualize the quadratic division of the shadow crowns: the luminosity is inversely proportional to the squares of their radii. Let’s see what the performance measurements give us:
[Starting] Opening the serial port - /dev/cu.usbmodem141401
[Info] Opened the serial port - /dev/cu.usbmodem141401
CPU: 98, RAM: 9755
CPU: 98, RAM: 9755
CPU: 98, RAM: 9755
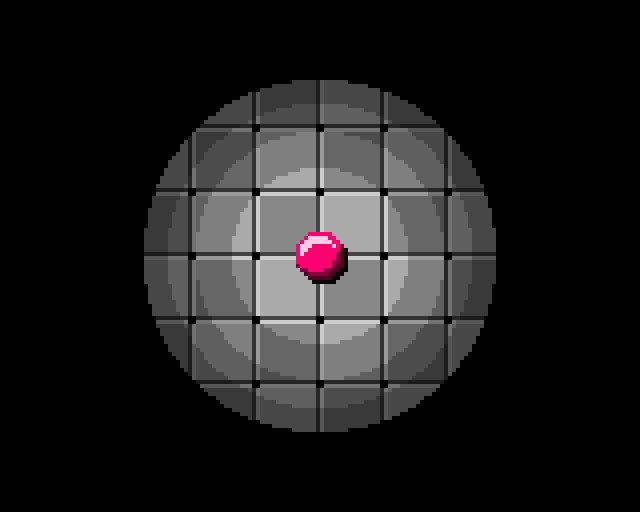
Ouch! You can see that it has a cost! The processor is running at almost full capacity!… Come on, don’t even be afraid… let’s move on to 32 levels of brightness for more smoothness in the rendering:
const uint8_t Tiling::BRIGHTNESS_LEVELS = 0b1<<5; // 2^5 = 32
Wooooooow...
You will notice that the performance remains the same. Thanks to the powers of 2! By the way, try to set a value that is not a power of 2 to the constant BRIGHTNESS_LEVELS, for example 25… you will see the impact on performance! Don’t rely too much on what is sent to the serial port… this display only takes place outside the draw() method… so if the CPU load is too high, the data will be sent as soon as it exits the draw() method and it can blow a little. As a result, the values displayed do not really reflect the actual load…. On the other hand, try to move your ball… you will quickly realize the real impact on performance. So you can see that working with powers of 2 can greatly optimize a calculation. And this is quite logical, since in this case, arithmetic operations can often be simplified by simple bit shifts. Put it in one of your memory boxes .
We could still optimize things. For example, since the square of the light halo radius is a power of 2:
// the following test could be replaced
if (r2 <= HALO_RADIUS2) ...

// by this one
if (!(r2 >> 11)) ...
We could also rewrite the color codes in big-endian in the constant BITMAP: it would save us 1 reversal (but not the other!)… on the other hand, we would gain almost nothing on this operation (which is very fast). And it’s useless at this stage anyway, since I’m now going to propose another way to optimize things significantly….
A new idea?
What seals the performance here is of course the calculation on the brightness, which is done on each pixel. How could we reduce the processor load? Well, simply by having done the calculations beforehand, in his place. But how? Well, it’s very simple: all you have to do is provide the CPU with a spritesheet that integrates all the pre-calculated color codes with all the brightness levels you want to display:
![]()
All you have to do is go and pick the pixel in the appropriate tile. This solution is not bad at all… but it has three major disadvantages! If you wanted to change the number of brightness levels, you would have to completely redesign the spritesheet, which can be laborious in the long run… As well as if you want to display many levels of brightness, the design of the spritesheet can also be laborious here… And what’s more, the more tiles you have to integrate, the more memory space they will take up! You can see that this is not the best solution after all.
The right solution
But there is another solution . Indeed, we could index the colors used on the tile.png spritesheet as I gave it to you (there are 4). Then reconstruct the BITMAP constant using these indexes rather than the color codes RGB565.
![]()
Then all that remains is to build a COLORMAP presenting all the declinations of the reference colors we have indexed, according to the desired brightness levels… and to write the color codes in little-endian. Well… it’s still a little work… But I thought of you: I published, at the same time as this tutorial, a small tool that will do all the calculations for you and provide you in fine with the corresponding BITMAP and COLORMAP constants.
Image Transcoder for Shading in High Res
On the tool page, enter the following settings, then drag and drop the `tiles.png’:

// reminder for decoding:
//
// number of frames: 2
// frame width: 16
// frame height: 16
// transparent color: 0xffff
// brightness levels: 32

const uint8_t BITMAP[] = {
    // frame #1
    0, 1, 1, 1, 1, 1, 1, 1, 1, 1, 1, 1, 1, 1, 1, 0,
    1, 2, 2, 2, 2, 2, 2, 2, 2, 2, 2, 2, 2, 2, 2, 3,
    1, 2, 2, 2, 2, 2, 2, 2, 2, 2, 2, 2, 2, 2, 2, 3,
    1, 2, 2, 2, 2, 2, 2, 2, 2, 2, 2, 2, 2, 2, 2, 3,
    1, 2, 2, 2, 2, 2, 2, 2, 2, 2, 2, 2, 2, 2, 2, 3,
    1, 2, 2, 2, 2, 2, 2, 2, 2, 2, 2, 2, 2, 2, 2, 3,
    1, 2, 2, 2, 2, 2, 2, 2, 2, 2, 2, 2, 2, 2, 2, 3,
    1, 2, 2, 2, 2, 2, 2, 2, 2, 2, 2, 2, 2, 2, 2, 3,
    1, 2, 2, 2, 2, 2, 2, 2, 2, 2, 2, 2, 2, 2, 2, 3,
    1, 2, 2, 2, 2, 2, 2, 2, 2, 2, 2, 2, 2, 2, 2, 3,
    1, 2, 2, 2, 2, 2, 2, 2, 2, 2, 2, 2, 2, 2, 2, 3,
    1, 2, 2, 2, 2, 2, 2, 2, 2, 2, 2, 2, 2, 2, 2, 3,
    1, 2, 2, 2, 2, 2, 2, 2, 2, 2, 2, 2, 2, 2, 2, 3,
    1, 2, 2, 2, 2, 2, 2, 2, 2, 2, 2, 2, 2, 2, 2, 3,
    1, 2, 2, 2, 2, 2, 2, 2, 2, 2, 2, 2, 2, 2, 2, 3,
    0, 3, 3, 3, 3, 3, 3, 3, 3, 3, 3, 3, 3, 3, 3, 0,
    // frame #2
    0, 1, 1, 1, 1, 1, 1, 1, 1, 1, 1, 1, 1, 1, 1, 0,
    1, 4, 4, 4, 4, 4, 4, 4, 4, 4, 4, 4, 4, 4, 4, 3,
    1, 4, 4, 4, 4, 4, 4, 4, 4, 4, 4, 4, 4, 4, 4, 3,
    1, 4, 4, 4, 4, 4, 4, 4, 4, 4, 4, 4, 4, 4, 4, 3,
    1, 4, 4, 4, 4, 4, 4, 4, 4, 4, 4, 4, 4, 4, 4, 3,
    1, 4, 4, 4, 4, 4, 4, 4, 4, 4, 4, 4, 4, 4, 4, 3,
    1, 4, 4, 4, 4, 4, 4, 4, 4, 4, 4, 4, 4, 4, 4, 3,
    1, 4, 4, 4, 4, 4, 4, 4, 4, 4, 4, 4, 4, 4, 4, 3,
    1, 4, 4, 4, 4, 4, 4, 4, 4, 4, 4, 4, 4, 4, 4, 3,
    1, 4, 4, 4, 4, 4, 4, 4, 4, 4, 4, 4, 4, 4, 4, 3,
    1, 4, 4, 4, 4, 4, 4, 4, 4, 4, 4, 4, 4, 4, 4, 3,
    1, 4, 4, 4, 4, 4, 4, 4, 4, 4, 4, 4, 4, 4, 4, 3,
    1, 4, 4, 4, 4, 4, 4, 4, 4, 4, 4, 4, 4, 4, 4, 3,
    1, 4, 4, 4, 4, 4, 4, 4, 4, 4, 4, 4, 4, 4, 4, 3,
    1, 4, 4, 4, 4, 4, 4, 4, 4, 4, 4, 4, 4, 4, 4, 3,
    0, 3, 3, 3, 3, 3, 3, 3, 3, 3, 3, 3, 3, 3, 3, 0
};

const uint16_t COLORMAP[] = {
    // color #0 (transparent color)
    0xffff,
    // color #1
    0x79ce, 0x38c6, 0xf7bd, 0xd7bd, 0x96b5, 0x75ad, 0x34a5, 0xf39c, 0xd39c, 0x9294, 0x718c, 0x3084, 0x1084, 0xcf7b, 0x8e73, 0x6d6b, 0x2c63, 0x0c63, 0xcb5a, 0x8a52, 0x694a, 0x2842, 0x0842, 0xc739, 0x8631, 0x6529, 0x2421, 0x0421, 0xc318, 0x8210, 0x6108, 0x2000,
    // color #2
    0x55ad, 0x34a5, 0xf39c, 0xd39c, 0xb294, 0x718c, 0x518c, 0x3084, 0x1084, 0xcf7b, 0xae73, 0x8e73, 0x4d6b, 0x2c63, 0x0c63, 0xcb5a, 0xaa52, 0x8a52, 0x494a, 0x2842, 0x0842, 0xc739, 0xa631, 0x8631, 0x4529, 0x2421, 0x0421, 0xc318, 0xa210, 0x8210, 0x4108, 0x2000,
    // color #3
    0x2842, 0x0842, 0x0842, 0xe739, 0xe739, 0xc739, 0xa631, 0xa631, 0x8631, 0x8631, 0x6529, 0x6529, 0x4529, 0x4529, 0x2421, 0x2421, 0x0421, 0x0421, 0xe318, 0xe318, 0xc318, 0xa210, 0xa210, 0x8210, 0x8210, 0x6108, 0x6108, 0x4108, 0x4108, 0x2000, 0x2000, 0x0000,
    // color #4
    0x518c, 0x3084, 0x1084, 0xcf7b, 0xae73, 0x8e73, 0x6d6b, 0x4d6b, 0x2c63, 0x0c63, 0xeb5a, 0xcb5a, 0xaa52, 0x8a52, 0x694a, 0x494a, 0x2842, 0x0842, 0xe739, 0xa631, 0x8631, 0x6529, 0x4529, 0x2421, 0x0421, 0xe318, 0xc318, 0xa210, 0x8210, 0x6108, 0x4108, 0x2000
};
The generated data saves a lot of memory space compared to the previous solution (which consisted in redrawing all sprites with different brightness levels). But let’s see right away how….
- implement this new spritesheet coding,
- and further optimize our rendering calculation method.
Let’s go back to the full declaration of our Tiling class to better see the changes we will make:
#ifndef SHADING_EFFECT_TILING
#define SHADING_EFFECT_TILING

#include "Renderable.h"

// the constant driving impulse
#define PULSE 1

// we have seen that the distance calculations
// could be done quickly using
// the square of the halo radius simply
// expressed as a power of 2
#define HALO_RADIUS2_POWER_OF_TWO 11

// and we can do the same with
// brightness levels
#define BRIGHTNESS_LEVELS_POWER_OF_TWO 5

class Tiling : public Renderable
{
    private:

        static const uint8_t TILE_WIDTH;
        static const uint8_t TILE_HEIGHT;

        // note the change in the type of values
        // now stored in the spritesheet
        static const uint8_t BITMAP[];

        // the color palette associated with the spritesheet
        // including all the luminous versions of the
        // reference colors of our sprites
        static const uint16_t COLORMAP[];

        // the kinematics properties
        float ax,ay;
        float vx,vy;
        int8_t offsetX,offsetY;

    public:

        Tiling();
        ~Tiling();

        // the move commands invoked by `GameEngine`
        void left();
        void right();
        void up();
        void down();

        // the connection point of the control loop
        void tick();

        // the rendering method
        void draw(uint8_t sliceY, uint8_t sliceHeight, uint16_t* buffer) override;
};

#endif
Let’s now look at the definitions of the static variables of our Tiling class as well as the new definition of the draw() method:
// the descriptive parameters of our sprites
const uint8_t Tiling::TILE_WIDTH = 16;
const uint8_t Tiling::TILE_HEIGHT = 16;

// the new spritesheet obtained with the transcoding tool
const uint8_t Tiling::BITMAP[] = {
    // light tile
    0, 1, 1, 1, 1, 1, 1, 1, 1, 1, 1, 1, 1, 1, 1, 0,
    1, 2, 2, 2, 2, 2, 2, 2, 2, 2, 2, 2, 2, 2, 2, 3,
    1, 2, 2, 2, 2, 2, 2, 2, 2, 2, 2, 2, 2, 2, 2, 3,
    1, 2, 2, 2, 2, 2, 2, 2, 2, 2, 2, 2, 2, 2, 2, 3,
    1, 2, 2, 2, 2, 2, 2, 2, 2, 2, 2, 2, 2, 2, 2, 3,
    1, 2, 2, 2, 2, 2, 2, 2, 2, 2, 2, 2, 2, 2, 2, 3,
    1, 2, 2, 2, 2, 2, 2, 2, 2, 2, 2, 2, 2, 2, 2, 3,
    1, 2, 2, 2, 2, 2, 2, 2, 2, 2, 2, 2, 2, 2, 2, 3,
    1, 2, 2, 2, 2, 2, 2, 2, 2, 2, 2, 2, 2, 2, 2, 3,
    1, 2, 2, 2, 2, 2, 2, 2, 2, 2, 2, 2, 2, 2, 2, 3,
    1, 2, 2, 2, 2, 2, 2, 2, 2, 2, 2, 2, 2, 2, 2, 3,
    1, 2, 2, 2, 2, 2, 2, 2, 2, 2, 2, 2, 2, 2, 2, 3,
    1, 2, 2, 2, 2, 2, 2, 2, 2, 2, 2, 2, 2, 2, 2, 3,
    1, 2, 2, 2, 2, 2, 2, 2, 2, 2, 2, 2, 2, 2, 2, 3,
    1, 2, 2, 2, 2, 2, 2, 2, 2, 2, 2, 2, 2, 2, 2, 3,
    0, 3, 3, 3, 3, 3, 3, 3, 3, 3, 3, 3, 3, 3, 3, 0,
    // dark tile
    0, 1, 1, 1, 1, 1, 1, 1, 1, 1, 1, 1, 1, 1, 1, 0,
    1, 4, 4, 4, 4, 4, 4, 4, 4, 4, 4, 4, 4, 4, 4, 3,
    1, 4, 4, 4, 4, 4, 4, 4, 4, 4, 4, 4, 4, 4, 4, 3,
    1, 4, 4, 4, 4, 4, 4, 4, 4, 4, 4, 4, 4, 4, 4, 3,
    1, 4, 4, 4, 4, 4, 4, 4, 4, 4, 4, 4, 4, 4, 4, 3,
    1, 4, 4, 4, 4, 4, 4, 4, 4, 4, 4, 4, 4, 4, 4, 3,
    1, 4, 4, 4, 4, 4, 4, 4, 4, 4, 4, 4, 4, 4, 4, 3,
    1, 4, 4, 4, 4, 4, 4, 4, 4, 4, 4, 4, 4, 4, 4, 3,
    1, 4, 4, 4, 4, 4, 4, 4, 4, 4, 4, 4, 4, 4, 4, 3,
    1, 4, 4, 4, 4, 4, 4, 4, 4, 4, 4, 4, 4, 4, 4, 3,
    1, 4, 4, 4, 4, 4, 4, 4, 4, 4, 4, 4, 4, 4, 4, 3,
    1, 4, 4, 4, 4, 4, 4, 4, 4, 4, 4, 4, 4, 4, 4, 3,
    1, 4, 4, 4, 4, 4, 4, 4, 4, 4, 4, 4, 4, 4, 4, 3,
    1, 4, 4, 4, 4, 4, 4, 4, 4, 4, 4, 4, 4, 4, 4, 3,
    1, 4, 4, 4, 4, 4, 4, 4, 4, 4, 4, 4, 4, 4, 4, 3,
    0, 3, 3, 3, 3, 3, 3, 3, 3, 3, 3, 3, 3, 3, 3, 0
};

// the color palette provided by the transcoding tool
// including their 32 levels of brightness
const uint16_t Tiling::COLORMAP[] = {
    // color #0 (transparent color)
    0xffff,
    // color #1
    0x79ce, 0x38c6, 0xf7bd, 0xd7bd, 0x96b5, 0x75ad, 0x34a5, 0xf39c, 0xd39c, 0x9294, 0x718c, 0x3084, 0x1084, 0xcf7b, 0x8e73, 0x6d6b, 0x2c63, 0x0c63, 0xcb5a, 0x8a52, 0x694a, 0x2842, 0x0842, 0xc739, 0x8631, 0x6529, 0x2421, 0x0421, 0xc318, 0x8210, 0x6108, 0x2000,
    // color #2
    0x55ad, 0x34a5, 0xf39c, 0xd39c, 0xb294, 0x718c, 0x518c, 0x3084, 0x1084, 0xcf7b, 0xae73, 0x8e73, 0x4d6b, 0x2c63, 0x0c63, 0xcb5a, 0xaa52, 0x8a52, 0x494a, 0x2842, 0x0842, 0xc739, 0xa631, 0x8631, 0x4529, 0x2421, 0x0421, 0xc318, 0xa210, 0x8210, 0x4108, 0x2000,
    // color #3
    0x2842, 0x0842, 0x0842, 0xe739, 0xe739, 0xc739, 0xa631, 0xa631, 0x8631, 0x8631, 0x6529, 0x6529, 0x4529, 0x4529, 0x2421, 0x2421, 0x0421, 0x0421, 0xe318, 0xe318, 0xc318, 0xa210, 0xa210, 0x8210, 0x8210, 0x6108, 0x6108, 0x4108, 0x4108, 0x2000, 0x2000, 0x0000,
    // color #4
    0x518c, 0x3084, 0x1084, 0xcf7b, 0xae73, 0x8e73, 0x6d6b, 0x4d6b, 0x2c63, 0x0c63, 0xeb5a, 0xcb5a, 0xaa52, 0x8a52, 0x694a, 0x494a, 0x2842, 0x0842, 0xe739, 0xa631, 0x8631, 0x6529, 0x4529, 0x2421, 0x0421, 0xe318, 0xc318, 0xa210, 0x8210, 0x6108, 0x4108, 0x2000
};

// you'll see that we're going to optimize some things and that,
// finally, if you remove all comments, this method is
// quite concise :-)
void Tiling::draw(uint8_t sliceY, uint8_t sliceHeight, uint16_t* buffer) {
    bool txodd,tyodd,jump;
    uint16_t nfo = TILE_WIDTH * TILE_HEIGHT;
    uint8_t sy,x,y;
    uint8_t xo,yo;
    uint16_t syw;
    uint16_t index, index_y, value;

    // we will need to measure the square of the distance `r2`
    // between the pixel of the tiling and the center of the screen....
    // an intermediate calculation will determine
    // the Y component of `r2` that will be named `ry2`
    uint16_t r2,ry2;
    uint8_t hsw = SCREEN_WIDTH / 2;
    uint8_t hsh = SCREEN_HEIGHT / 2;

    // we will then calculate the brightness level of the pixel
    // as a function of the ratio between the square of the distance `r2`
    // which separates it from the center of the screen
    // and the square of the halo radius defined as a power of 2
    // `HALO_RADIUS2_POWER_OF_TWO`
    uint8_t lux;

    // this variable will allow us to store the color index
    // retrieved from the spritesheet and corresponding to
    // the index of the reference color in the `COLORMAP` palette
    uint8_t colorIndex;

    // we plunge the whole scene into darkness by filling the slice with zeros
    // > we use pointers here to speed up processing...
    // we could also move this procedure
    // in the `draw()` method of the `Renderer`
    uint32_t* tmp = (uint32_t*)buffer;
    uint16_t bs = (sliceHeight * SCREEN_WIDTH) >> 1;
    while (bs--) *tmp++ = 0;

    // Come on... let's go!
    for (sy = 0; sy < sliceHeight; sy++) {
        syw = sy * SCREEN_WIDTH;
        y = sliceY + sy;
        yo = y + this->offsetY;
        tyodd = (yo / TILE_HEIGHT) % 2;
        index_y = (yo % TILE_HEIGHT) * TILE_WIDTH;

        // the Y component of the square of the distance that
        // separates the pixel from the center of the screen
        // is calculated
        ry2 = (y - hsh) * (y - hsh);

        for (x = 0; x < SCREEN_WIDTH; x++) {
            xo = x + this->offsetX;
            txodd = (xo / TILE_WIDTH) % 2;
            jump = txodd ^ tyodd;
            index = index_y + (xo % TILE_WIDTH) + (jump * nfo);

            // we calculate the square of the distance between
            // the pixel and the center of the screen
            r2 = (x - hsw) * (x - hsw) + ry2;

            // if the pixel is inside the light halo
            if (!(r2 >> HALO_RADIUS2_POWER_OF_TWO)) {
                // we get the color code of the tile's sprite
                colorIndex = BITMAP[index];

                // if it is not the transparent color
                if (colorIndex--) {
                    // remark on the `--`
                    // if colorIndex is not the index of the transparent color
                    // then colorIndex > 0... so we're going to decrease its value
                    // immediately after reading it to simplify the calculation
                    // which will consist in picking the color code from the
                    // the color palette `COLORMAP`
                    //
                    // the brightness level is calculated at this distance
                    lux = (r2 << BRIGHTNESS_LEVELS_POWER_OF_TWO) >> HALO_RADIUS2_POWER_OF_TWO;

                    // we will then pick the corresponding color code
                    // in the color palette....
                    // > and do not forget to apply the corresponding offset
                    // > of the transparent color, which is the first element
                    // > of `COLORMAP`
                    // and we end by writing this value in the buffer
                    buffer[x + syw] = COLORMAP[1 + (colorIndex << BRIGHTNESS_LEVELS_POWER_OF_TWO) + lux];
                }
            }
        }
    }
}

// and this is the work ;-)
You can see here that, since we initialized our buffer with 0,
we can content ourselves with writing on it only when we are inside the light halo, and the color to be copied is not the transparent color of the sprite. This saves us a lot of time by reducing the computation and writing operations in the buffer!
Well… we can now compile and start the execution:
Let’s now take a look at the performance:
[Starting] Opening the serial port - /dev/cu.usbmodem141401
[Info] Opened the serial port - /dev/cu.usbmodem141401
CPU: 73, RAM: 9739
CPU: 73, RAM: 9739
CPU: 73, RAM: 9739
We did a good job: we dropped the CPU load from 98% to 73%… Congratulations!
We should be able to increase the framerate to 32 to be 100% at the CPU load level. This will increase the impression of fluidity in the rendering.
gb.setFrameRate(32);
And… voilà! This tutorial is over. We did a good job. The finalized rendering looks good, you’ll agree . I still have to add the last word… so let’s move on to the next and last chapter…