
Downloading the PHP script
Now that your sketch is configured, you can proceed to save your META screen. To do this, you will need a PHP scipt (screenrecord) that will listen to the serial port through which the console will communicate its data to your computer. screenrecord will therefore receive this raw data: it is a stream of 16-bit integers encoding the colors of all the pixels that are displayed on the screen. The script will therefore decode all this data, rebuild the frames that follow each other on the META screen and save each of them in a PNG file. All these files will be numbered to keep the order of capture. You can then use the convert tool, which is part of the ImageMagick software suite, to convert this series of PNG files into an animated GIF.
We will start by downloading the PHP script to install it on your computer. To do this, right-click on the following link: screenrecord, then select Save link as… and save it in your Downloads folder.
Installing the script
The first thing to do is to make it executable by your operating system and to ensure that it can be located by your system, regardless of the directory in which you are located.
macOS Mojave & Debian Linux
To make your script executable, run the following commands:
$ cd ~/Downloads          # <-- the directory where you saved the script
$ chmod u+x screenrecord  # <-- adds the permission to execute
The location of executables by the system is based on the PATH environment variable. If you already have a directory in your user space where you usually store your scripts and executable binaries, store the screenrecord script there. Your PATH variable is probably already configured to take it into account. Otherwise, keep reading on…
If you do not yet have a directory dedicated to this use, I suggest you create one (for example ~/bin). Open a Terminal and run the following commands:
$ mkdir ~/bin           # <-- creation of your executable directory
$ cd ~/Downloads        # <-- the directory where you saved the script
$ mv screenrecord ~/bin # <-- move it to your executable directory
Then edit your ~/.bashrc configuration file and add the following line at the end:
export PATH="$HOME/bin:$PATH"
That’s it, you should now be able to execute the screenrecord script, no matter what directory you’re in:
$ screenrecord -h

+---------------------------------------+
|    Gamebuino META Screen Recorder     |
| © 2019 Stéphane Calderoni (aka Steph) |
|     https://gamebuino.com/@steph      |
+---------------------------------------+

Usage: screenrecord [options]

DESCRIPTION

	This utility records the Gamebuino META screen in Standard & High Definition
	using communication through a serial port

OPTIONS

	-h  displays the synopsis
	-p  sets the serial port (default: /dev/cu.usbmodem141401)
	-d  sets the output directory (default: current directory)
	-b  sets the image files basename (default: frame)
	-n  sets the number of digits to number the image files (default: 4)

ANIMATED GIF CREATION

	You must have imagemagick installed to be able to create the animated GIF file.
	For example, to create an animation with a resolution of 160x128 pixels at 25 fps,
	simply type the following command:

	convert -delay 4 -loop 0 png_dir_path/*.png -scale 160x128 screenrecording.gif
Windows 10
In the case of Windows, there are a few more complex steps to follow to make PHP work more easily from the command line. I encourage you to consult this documentation if you wish to apply them.
But we would prefer to use a more immediate method here to get to the point and be able to make our recordings quickly. Remember that you installed PHP in the C:\PHP7 folder and added it to your Path environment variable. In this way, the php.exe executable is accessible regardless of the directory in which you are located from your shell.
We will apply essentially the same method to set the localization of the screenrecord script. For example, we will create a C:\bin directory and move the script to it by adding the extension .php :
$ mkdir C:\bin
$ move %HomePath%\Downloads\screenrecord C:\bin\screenrecord.php
To check that the script can be executed, we can run the following command:
$ php C:\bin\screenrecord.php -h
It’s quite long, isn’t it? To simplify things we will create a batch file that will do it for us. And we will name this file screenrecord.bat. So create this file in your C:\bin directory and write the following lines there:
@echo OFF
php C:\bin\screenrecord.php %*
All we have to do now is add C:\bin to the Path environment variable, as we did in the Brewing section during the PHP installation…
And now, you can launch this batch command file from any directory:
$ screenrecord.bat -h

+---------------------------------------+
|    Gamebuino META Screen Recorder     |
| © 2019 Stéphane Calderoni (aka Steph) |
|     https://gamebuino.com/@steph      |
+---------------------------------------+

Usage: screenrecord [options]

DESCRIPTION

	This utility records the Gamebuino META screen in Standard & High Definition
	using communication through a serial port

OPTIONS

	-h  displays the synopsis
	-p  sets the serial port (default: /dev/cu.usbmodem141401)
	-d  sets the output directory (default: current directory)
	-b  sets the image files basename (default: frame)
	-n  sets the number of digits to number the image files (default: 4)

ANIMATED GIF CREATION

	You must have imagemagick installed to be able to create the animated GIF file.
	For example, to create an animation with a resolution of 160x128 pixels at 25 fps,
	simply type the following command:

	convert -delay 4 -loop 0 png_dir_path/*.png -scale 160x128 screenrecording.gif
How do I record my screen?
The first thing to do here is to determine the identifier of the serial device by which your META will communicate with your computer.
Identify the serial port
Connect the META to your computer with a USB cable, then open the Arduino IDE and go to the Tools menu:
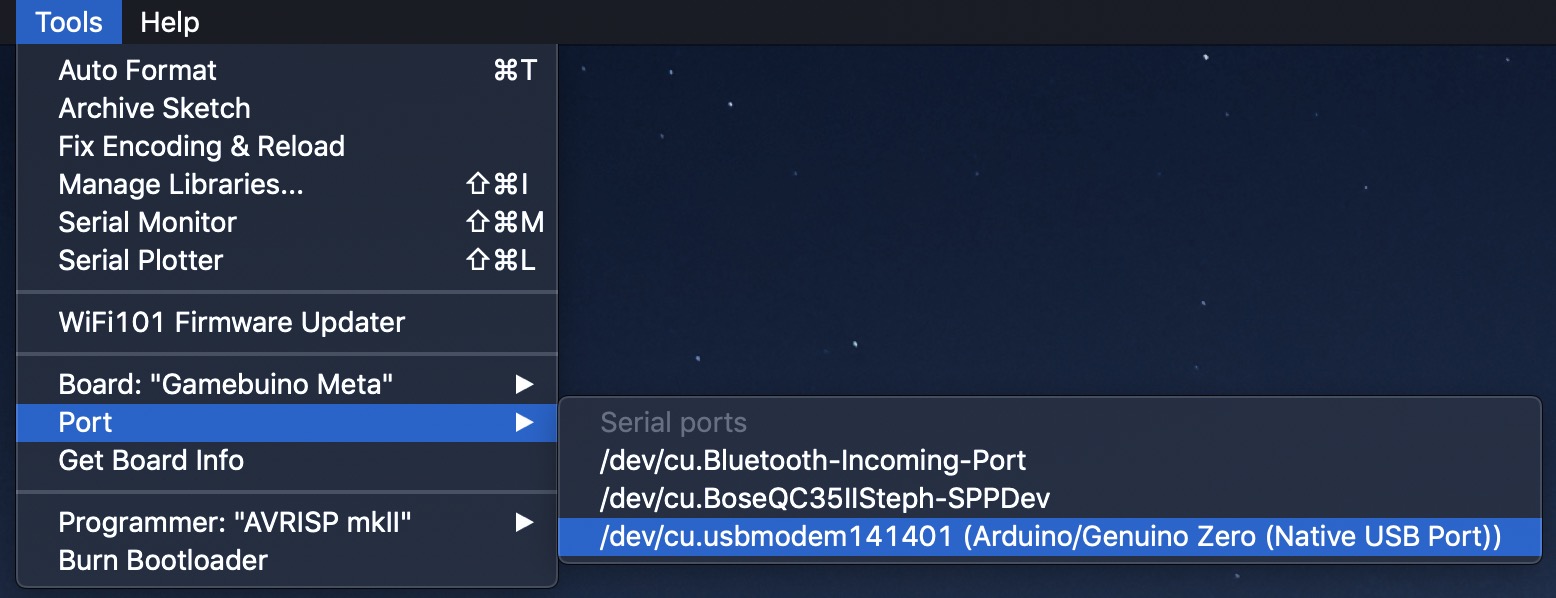
In my case it is /dev/cu.usbmodem141401. The port identifier will probably be different for you, but it’s not embarrassing. It is precisely this identifier that you will need to specify to screenrecord when you run it. So write it down somewhere!
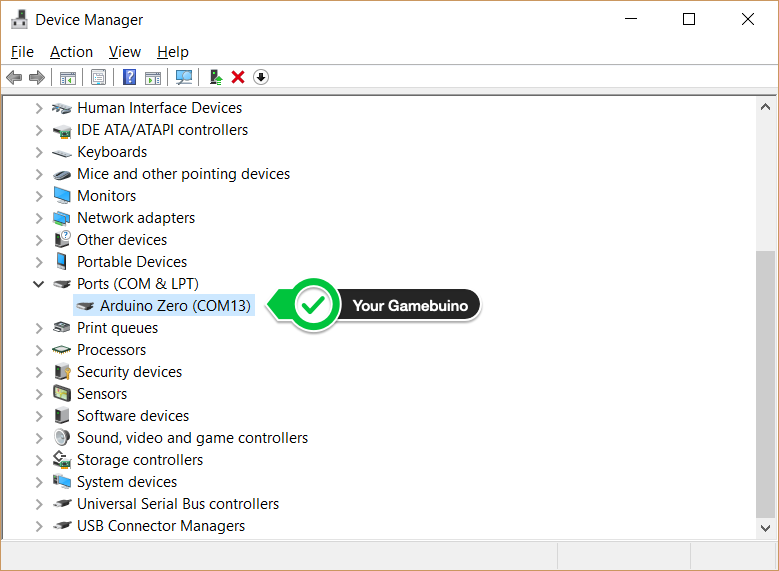
Note about Windows
You will first have to go to the Device Manager to identify the right port:
Here, it is the port
COM13. Remember it for the rest…
Manual recording
Now that we have identified the right port, and we can execute the screenrecord command from any directory, you can go to the Gamebuino project directory of your choice (the one you configured by adding the necessary instructions that invoke the ScreenRecorder class).
In the previous chapter, we created an application for high resolution (Sketch.ino). If you have copied it, you can go to the corresponding directory.
As we have seen, the PHP script will create a series of PNG files during the screen recording. I suggest you to create a directory that will allow you to host these files so as not to mess up your project We will name this directory frames :
$ mkdir frames
Compile and upload your C++ code to the META to launch your application, then execute the following command (taking care to replace the serial port identifier with the one that matches you):
$ screenrecord -d frames -p /dev/cu.usbmodem141401     # <-- macOS & Linux
$ screenrecord.bat -d frames -p COM13                  # <-- Windows 10
You will notice that the script waits for the data by listening on the serial port….
On the META, to start recording, press and hold (at least 1 second) the MENU button (then you can release). You will notice that the LEDs on the console emit red flashes at regular intervals. This means that it is actually sending the display data to the serial port. At the same time, you will see on your shell that the script receives this data and records it in the order of arrival of the captures. You should observe something like that:
$ screenrecord -d frames

Start listening to the serial port /dev/cu.usbmodem141401

Waiting for data... Start screen recording in high resolution

Decoding frame 0001... saved
Decoding frame 0002... saved
Decoding frame 0003... saved
Decoding frame 0004... saved
Decoding frame 0005... saved
Decoding frame 0006... saved
Decoding frame 0007... saved
Decoding frame 0008... saved
Decoding frame 0009... saved
Decoding frame 0010... saved
.
.
.
To stop recording, briefly press the MENU button again… The LEDs go out, the data flow stops and the script stops also:
.
.
.
Decoding frame 0100... saved
Decoding frame 0101... saved
Decoding frame 0102... saved
Decoding frame 0103... saved
Decoding frame 0104... saved
Decoding frame 0105... saved
Decoding frame 0106... saved

106 PNG files have been recorded in 160x128 (high resolution).

You must have imagemagick installed to convert these PNG files into an animated GIF file.
For a 25 fps animation, simply type the following command:

convert -delay 4 -loop 0 frames/*.png -scale 160x128 screenrecording.gif
Finally, the command to create the GIF from the series of captures is indicated.
Note on the
delayoptionThe
Nvalue expected by thedelayoption is an integer that corresponds to an animation frequency of100/Nfps. So, ifN=4, your animated GIF will have a frequency of100/4 = 25fps.
In the code of Sketch.ino, we had specified 32 fps as execution frequency:
gb.setFrameRate(32);
So for our GIF to roughly respect this frequency, we will execute the following command:
$ convert -delay 3 -loop 0 frames/*.png -scale 160x128 screenrecording.gif
And we get the file screenrecording.gif which is as follows:

Note
I cheated a little… I deleted the extra frames so that the loop animation is perfectly connected… (it is enough here to keep only the first 64 frames).
It is still possible to correct your recording, by deleting frames, or reordering them if necessary. Practical, isn’t it?
Here is a short demo that illustrates the entire recording procedure we have just applied:
Automated recording
I simply remind you here that, rather than manually starting and stopping the recording, using the MENU button, you can automate it directly in your C++ code by placing the following instructions in the appropriate places:
ScreenRecorder::startRecording(); // to start the recording
ScreenRecorder::stopRecording();  // to stop the recording
This way, you will be able to control more precisely the scenes you record, and to produce GIFs that correspond exactly to what you want us to see
I hope you will find this tool useful. I had a great need for it myself, and I am very happy to be able to share it today. If you notice any dysfunctions, if you see possible improvements, or if you want to show me the captures you are most proud of, don’t hesitate to leave me a little comment on the page of this creation!
The code of the ScreenRecorder class and the screenrecord script are available on my GitHub repository. You can modify them freely, and if you improve them, we count on you to let us benefit from them