Sketch configuration
To record successive screenshots of an application running on your META, you will need a specific component to perform this task: the ScreenRecorder. To integrate this component into your project, you will need to download two files that respectively declare and define the C++ ScreenRecorder class:
- ScreenRecorder.h which is the declarative header file of the class,
- ScreenRecorder.cpp which is the class definition file.
To download them, right-click on each of the links, and select Save Link As… to save it in your project directory.
We will now examine how to integrate and invoke the services offered by this class in your project. We will distinguish the case of an application developed for standard resolution from that of an application developed for high resolution, because the instructions differ slightly and above all, the appropriate time to invoke the ScreenRecorder class must be chosen carefully.
For an application in standard resolution
This is the simplest case.
Edit the main sketch of your application (here, I will name it Sketch.ino) and insert the instructions indicated in the code below:
#include <Gamebuino-Meta.h>
#include "ScreenRecorder.h" /* <-- insert this line */

void setup() {
    gb.begin();

    // your initialization
    // instructions

    ScreenRecorder::init(); // <-- insert this line

    // ---------------------------------------------------------
    // !!! also insert this one if you are on Windows: !!!
    //
    ScreenRecorder::setForWindows();
    // ---------------------------------------------------------
}

void loop() {
    while (!gb.update());

    // your instructions to
    // make on-screen plots
    // using gb.display

    ScreenRecorder::monitor(gb.display._buffer); // <-- insert this line
}
That’s all you have to do!….. Simple, right?
Important note about Windows
The implementation of the
freadPHP function in Windows is buggy: indeed, the read buffer only reveals the accumulated data in 8K packets. Therefore, we are forced to use a trick to get rid of this bug. So it is imperative to add the following line to specify that the data reception will be done on Windows:
ScreenRecorder::setForWindows();If you are on macOS or Linux, do not add this line….
For an application in high resolution
In the case of an application developed for high resolution, things are a little different. Indeed, you will not be able to use the traditional drawing methods provided by gb.display… I encourage you to read Andy’s excellent article on the subject: High Resolution without gb.display, which briefly explains why this is not possible and gives you a workaround method that consists of using gb.tft directly. I wrote a very complete tutorial on how to deepen this technique. You can read it if you are interested (beginners may have some difficulty assimilating everything): Shading Effect in High Resolution. It will give you an in-depth understanding of how to apply this technique in your applications.
To return to our ScreenRecorder, and to illustrate how it should be configured for high resolution, we will borrow the code proposed by Andy in his article, which I slightly modified to define a division of the screen into horizontal slices. Indeed, you will have to apply this type of cutting to be able to use ScreenRecorder.
I have already inserted the necessary lines for the configuration of
ScreenRecorder.
You can download this modified version and review it in detail:
/*
 * This code is an adaptation of Andy O'Neill's,
 * from his article "High Resolution without gb.display",
 * which I slightly modified to apply a division
 * of the screen into horizontal slices.
 */

#include <Gamebuino-Meta.h>
#include "ScreenRecorder.h"

// Initialization of display constants
#define SCREEN_WIDTH  160
#define SCREEN_HEIGHT 128
#define SLICE_HEIGHT    8 /* each slice measures 160x8 pixels */

// Magic to get access to wait_for_transfers_done
namespace Gamebuino_Meta {
    #define DMA_DESC_COUNT (3)
    extern volatile uint32_t dma_desc_free_count;
    static inline void wait_for_transfers_done(void) {
        while (dma_desc_free_count < DMA_DESC_COUNT);
    }
    static SPISettings tftSPISettings = SPISettings(
        24000000,
        MSBFIRST,
        SPI_MODE0
    );
};

// Double buffers for screen data. Fill one while the other is being sent to the screen.
uint16_t buffer1[SCREEN_WIDTH * SLICE_HEIGHT];
uint16_t buffer2[SCREEN_WIDTH * SLICE_HEIGHT];

void setup() {
    gb.begin();
    // We aren't using the normal screen buffer, so initialize it to 0x0 pixels.
    gb.display.init(0, 0, ColorMode::rgb565);
    // Just to push things to the limit for this example, increase to 40fps.
    gb.setFrameRate(32);
    //
    // ------------------------------------------
    // Initialization of the screen recorder
    ScreenRecorder::init(SLICE_HEIGHT);
    // !!! ADD THIS LINE IF YOU ARE ON WINDOWS !!!
    ScreenRecorder::setForWindows();
    // ------------------------------------------
    //
}

void loop() {
    while (!gb.update());

    // Loop over each 160x8 pixels slice of the screen.
    for (
        uint8_t sliceIndex = 0;
        sliceIndex < SCREEN_HEIGHT / SLICE_HEIGHT;
        sliceIndex++
    ) {
        // Alternate between buffers. While one is being sent to
        // the screen with the DMA controller, the other can be
        // used for buffering the next slice of the screen.
        uint16_t *buffer = sliceIndex % 2 == 0 ? buffer1 : buffer2;

        // BEGIN DRAWING TO BUFFER
        uint16_t sliceY  = sliceIndex * SLICE_HEIGHT;
        uint16_t initRed = sliceY + gb.frameCount;
        uint16_t blue    = gb.frameCount % 32;
        for (uint8_t x = 0; x < SCREEN_WIDTH; x++) {
                uint16_t red = initRed;
                ++blue %= 32;
                for (uint8_t y = 0; y < SLICE_HEIGHT; y++) {
                        ++red %= 32;
                        uint16_t green = x + y + initRed;
                        buffer[x + y * SCREEN_WIDTH] =
                            (blue  <<  8) |
                            (red   <<  3) |
                            (green << 13) |
                            ((0b111000 & green) >> 3);
                }
        }
        // END DRAWING TO BUFFER

        // As long as this isn't the first time through the loop,
        // make sure the previous write to the screen is done.
        if (sliceIndex != 0) waitForPreviousDraw();
        // And finally send the current buffer slice to the screen!
        customDrawBuffer(0, sliceY, buffer, SCREEN_WIDTH, SLICE_HEIGHT);
        //
        // ------------------------------------------
        // Record the buffer slice
        ScreenRecorder::monitor(buffer, sliceIndex);
        // ------------------------------------------
        //
    }
    // Wait for the final slice to complete before leaving the function.
    waitForPreviousDraw();
}

// Use gb.tft calls to communicate with the screen.
void customDrawBuffer(
    int16_t x,
    int16_t y,
    uint16_t *buffer,
    uint16_t w,
    uint16_t h) {
    gb.tft.setAddrWindow(x, y, x + w - 1, y + h - 1);
    SPI.beginTransaction(Gamebuino_Meta::tftSPISettings);
    gb.tft.dataMode();
    gb.tft.sendBuffer(buffer, w*h);
}

void waitForPreviousDraw() {
    Gamebuino_Meta::wait_for_transfers_done();
    gb.tft.idleMode();
    SPI.endTransaction();
}
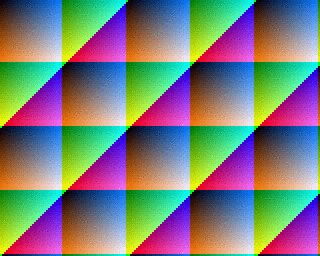
If you run this code on the META, you will get the following animation:

You will notice that, unlike the configuration for a standard resolution:
ScreenRecorderis initialized with the height of the screen slices,- and we also specify the index of the current slice during the monitoring of the screen: it is necessary for it to start the transmission to the PHP script as soon as it detects the first slice (the one of zero index).
In addition, you can see that the ScreenRecorder is only invoked after the current slice buffer has been filled.
Important note
When initializing the
ScreenRecorder, note that the height of the slices must necessarily be a non-zero power of2, whose maximum value is16… so only the values2,4,8and16will be taken into account. If you use a value greater than16, the recording will simply be disabled. And if you use a value lower than16which is not a power of2, you will get a rather strange recording…I advise you to use the value
8which only requires2x2.5=5KB in RAM.
How to configure automatic recording
In the next chapter we will see how to manually trigger and stop the recording. But you can also do it automatically by inserting the corresponding instructions directly into your code. This can be very useful when you want to start or stop recording at specific times, or when certain events occur. To do this, simply insert each of the following two instructions wherever you wish:
ScreenRecorder::startRecording();
ScreenRecorder::stopRecording();
There you go! Now, you know how to configure your sketch to be able to continuously record what is displayed on the META screen. So let’s see how to actually make this recording to get an animated GIF….